Showing posts with label dessert. Show all posts

Monday, October 25, 2010

#GreatHallowTweet Halloween BlogHop and Rice Krispie Treat Pumpkins!

I was invited to join in on last years #GreatHallowTweet Halloween BlogHop but found myself just too busy to commit and say yes.  Sadly I ended up regretting it and was determined to be a part this year. 

In case you missed last years #GHT Halloween BlogHop you need to know that this is the brain child of Renee from Flamingo Musings.  The widget on the side bar show everyone who is playing and makes it easy for you to “hop” from one participating blog to the next!  So from October 25th to the 31st, just click on any of these links and hop from blog to blog. Fun! Frolic! Mayhem! From ghoulish recipes to please monsters of all ages, to general insanity, make the rounds everyday to see what new surprises might be lurking around that dark corner. You know - the one with the broken streetlight and creepy shadows? BWAHAHAHAHA!

DSC_0004

Rice Krispie Treat Pumpkins (adapted from the Rice Krispie website)

Ingredients:

  • 3 tablespoons butter or margarine
  • 1 package (10 oz., about 40) regular marshmallows
  • - OR -
  • 4 cups miniature marshmallows
  • Red food coloring
  • Yellow food coloring
  • 6 cups Rice Krispies®
  • Green frosting for piping on stems and leaves

    Directions:

    1. In large saucepan melt butter over low heat. Add marshmallows and stir until completely melted. Remove from heat. To tint orange stir in red and yellow food coloring, if desired.
    2. Add KELLOGG'S RICE KRISPIES cereal. Stir until well coated.
    3. Using 1/2-cup measuring cup coated with cooking spray divide warm cereal mixture into portions. Using buttered hands shape each portion into pumpkin shape. 
    4.  Use the green frosting to make a stem and leaves to make them look like pumpkins. Best if served the same day.

    ***These were so much fun to make.  I had the kids help out of course.  I just wish I had of made them more orange but my youngest has issues with dyes so I was hesitant to use more.  Next time I will also melt some chocolate and make little faces on them but for this one I wanted to use the Halloween cupcake

    signature

  • Wednesday, September 22, 2010

    Haystacks in honor of National White Chocolate Day…

    This is not a sponsored post, just something I tried and really, really liked. 

    Also with it being National White Chocolate Day how could I not?

    DSC_0251

    Now I know these don’t look like much (white cookies on white plate…Doh!) and I am almost embarrassed to post a “recipe” for them but these are really, really good and something we all loved even though none of us really, really love white chocolate!

    Fiber One Haystacks

    Ingredients:

    1 sleeve of Fiber One Cereal (it comes two sleeves to a box)
    1-11 oz bag of Nestle white chocolate chips

    Directions:

    Melt morsels in the microwave until melted and smooth
    Stir in one sleeve fiber one until well coated.
    Working quickly, using a teaspoon, spoon  out onto a waxed paper-lined cookie sheet into 48 small mounds.
    Refrigerate until set. Store in an airtight container in refrigerator or freezer (I use a zip-loc bag).

    Number of Servings: 48  WW Points 1 per serving!!!

    ***You can use any type of chip that you like for this, chocolate chip, butterscotch chips etc. but we have found that the best are the white chocolate!!!

    signature

    Saturday, September 4, 2010

    Banana Cake with Chocolate Frosting

    So we can all do with another way to use up over ripe bananas right?

    I had a bunch sitting on the counter and I needed to find a way to use them up.  Sure I could have frozen them but it is so much more rewarding to make something out of them then to shove them into the deep dark abyss of the freezer!  This is what I came up with…

    DSC_0243

    Banana Cake with Chocolate Frosting (previously posted)

    Ingredients:

    1/2 cup butter
    1 1/2 cups sugar
    2 large eggs, beaten
    2 cups flour, sifted
    1/2 tsp. of salt
    1/4 tsp. baking powder
    1/2 cup milk
    1/4 tsp. vanilla
    3/4 tsp. baking soda (add to pureed bananas)
    3 pureed bananas, very ripe

    Directions:

    1. Preheat oven to 350 degrees. Grease and flour a 9x13" baking pan or two 9" layer cake pans.
    2. Cream butter, sugar and eggs. Sift flour several times, then add the salt and baking powder to the flour.
    3. To the creamed butter mixture, add the milk and flour (alternating, beginning and ending with flour).
    4. Add vanilla and mashed bananas (with the baking soda added to the bananas) to this mixture.
    5. Bake layer cakes (9") for 25-30 minutes, oblong (9x13") for 35-40 minutes.
    6. Allow to cool completely before frosting.

    "PERFECTLY CHOCOLATE" CHOCOLATE FROSTING (Hershey Cocoa container)

    Ingredients:

    1/2 cup (1 stick) butter or margarine
    2/3 cup HERSHEY'S Cocoa
    3 cups powdered sugar
    1/3 cup milk
    1 teaspoon vanilla extract

    Directions:

    Melt butter. Stir in cocoa. Alternately add powdered sugar and milk, beating to spreading consistency. Add small amount additional milk, if needed. Stir in vanilla. About 2 cups frosting.

    signature

    Friday, August 27, 2010

    Dark Chocolate and Bacon (yes, bacon) Cupcakes

    I have so many things that I have made and kept meaning to post.  You know like the perfect popsicle, or salad and then you get distracted by a play date by the pool, or a trip to the beach, or a lengthy vacation?  Well that’s exactly how my summer went. 

    So better late then never here are some cupcakes that I made for Tony’s birthday by special request.  I won’t even tell you when his birthday was but I will tell you that he loved these things!  For me it was really the novelty of it and I really didn’t like the smokiness with the chocolate but truth be told I am not a huge smoky flavor lover.  Really none of that mattered anyway.  It was his birthday and these are what he wanted…

    DSC_0127

    Dark Chocolate and Bacon Cupcakes (allrecipes.com)

    Ingredients
    • 12 slices bacon
    • 2 cups all-purpose flour
    • 3/4 cup unsweetened cocoa powder
    • 2 cups white sugar
    • 2 teaspoons baking soda
    • 1 teaspoon baking powder
    • 1/2 teaspoon sea salt
    • 2 eggs
    • 1 cup cold, strong, brewed coffee
    • 1 cup buttermilk
    • 1/2 cup vegetable oil
    • 1 tablespoon unsweetened cocoa powder, for dusting
    Directions
    1. Preheat oven to 375 degrees F (190 degrees C). Place bacon in a large, deep skillet. Cook over medium-high heat until evenly brown. Drain, crumble and set aside.
    2. In a large bowl, stir together the flour, 3/4 cup cocoa powder, sugar, baking soda, baking powder and salt. Make a well in the center and pour in the eggs, coffee, buttermilk and oil. Stir just until blended. Mix in 3/4 of the bacon, reserving the rest for garnish. Spoon the batter into the prepared cups, dividing evenly.
    3. Bake in the preheated oven until the tops spring back when lightly pressed, 20 to 25 minutes. Cool in the pan set over a wire rack. When cool, arrange the cupcakes on a serving platter. Frost with your favorite chocolate frosting and sprinkle reserved bacon crumbles on top. Dust with additional cocoa powder.

    signature

    Saturday, April 24, 2010

    You make your own birthday cake, right???

    It was my birthday last weekend and I made a birthday cake for myself.  Never really thought about it but from the reaction I got from everyone who knew I was doing this, not everyone does it!  Control issues?  Maybe, but I know what I like and how to get it!  Do it myself.

    My birthday always comes when strawberries are plentiful so naturally most of the cakes I have baked have strawberries involved.  This year they took center stage…along with some Limoncello of course!

    DSC_0068-1

    I first made this cake almost 2 years ago, here, and absolutely fell in love with it.  It is a beautiful dense cake and the mascarpone whipped cream was the perfect compliment but I was not really keen on the sherry macerated berries so this year I decided to macerate the berries in Limoncello…good move too!

    DSC_0074-1

    Mascarpone-Filled Cake with Limoncello Strawberries – adapted from Gourmet, July 2008

    Ingredients:

    For cake:
    2 cups sifted cake flour (not self-rising; sift before measuring)
    1 teaspoon baking powder
    1 teaspoon baking soda
    1/2 teaspoon salt
    1 stick unsalted butter, softened
    1 cup sugar
    1 teaspoon lemon extract
    2 large eggs
    1 cup well-shaken buttermilk

    For berries:
    1/2 cup Limoncello
    1/2 cup sugar
    4 cups strawberries, quartered

    For cream:
    8 ounces mascarpone cheese (1 cup)
    1 cup chilled heavy cream
    1/4 cup sugar

    Directions:

    Make cake:
    Preheat oven to 350°F with rack in middle. Butter a 9-inch round cake pan (2 inches deep). Line bottom with a round of parchment paper, then butter parchment.

    Sift together flour, baking powder, baking soda, and salt.

    Beat together butter and sugar in a large bowl with an electric mixer until pale and fluffy. Beat in vanilla. Add eggs 1 at a time, beating well after each addition. With mixer at low speed, beat in buttermilk until just combined. Add flour mixture in 3 batches, mixing after each addition until just combined.

    Spread batter in cake pan, smoothing top. Rap pan on counter several times to eliminate air bubbles.

    Bake until golden and a wooden pick inserted in center comes out clean, 35 to 40 minutes. Cool in pan on a rack 10 minutes. Run a knife around edge of cake to loosen, then invert onto a plate. Discard paper and reinvert cake onto rack to cool completely.

    Macerate berries:

    Pour the limoncello and the sugar over the berries and toss gently ( allow to satnd for about 30 minutes mixing periodically - or you can do it the real way and bring Limoncello and sugar to a boil in a small heavy saucepan, stirring until sugar has dissolved. Put berries in a bowl and pour hot syrup over them, gently tossing to coat. Let stand 15 minutes. make cream and assemble cake.

    Beat mascarpone and cream with sugar in a large bowl using cleaned beaters until mixture just holds stiff peaks.

    Halve cake horizontally with a long serrated knife. Carefully remove top half and reserve. Put bottom half on a plate, then spread evenly with half of the cream and replace top half. Use the rest of the cream on the top and serve with berries.

    Cooks notes:
    •Cake, without cream, can be baked 1 day ahead. Wrap in plastic wrap once cool and keep at room temperature.
    •Berries can macerate at room temperature up to 2 hours.

    signature

    Saturday, April 10, 2010

    The best frozen yogurt, EVER…

    The girls have been on Spring Break for the past week and then some. I can honestly say that I have had the best time with them and am looking forward to a whole summer with them and it can’t come soon enough. We’ve been to the beach, the pool, the park and Busch Gardens and with still plenty of down time for us to just relax.

    On one of those relaxing days I decided that I would make some ice cream but after going through the fridge I realized that I had no cream to make it with, but I did find a container of plain yogurt and some beautiful, ripe strawberries…

    DSC_0075-1

    Frozen Strawberry Yogurt

    Ingredients:

    2 1/2 cups of whole fat plain yogurt
    1 cup of pureed strawberries (cut up and pureed in your blender or food processor)
    1/3 cup of local honey

    Directions:

    • Mix all ingredients in a bowl.
    • Pour into ice cream maker and churn according to manufacturers directions until frozen. (Mine took about 20 minutes)
    • Scrape into a sealable container and freeze for about 2 hrs or until firm enough to scoop.
    • Serve with berries, granola or even chocolate syrup or chips!
    ***This could easily be adapted to any fruit you have and can make into a puree...think raspberry, blackberry, cherry or even banana!!!

    signature

    Saturday, April 3, 2010

    Lots of berries? Make Shortcake!

    Florida is having a tough time of it strawberry wise this year.  Somehow the market has dropped and the farmers are selling berries at ridiculously low prices to just get rid of them.  Last weekend there was even a UPick in Plant City that was GIVING them away!!!

    Needless to say we have lots of berries right now.  And that, my friends, is a very, very good thing…     DSC_0043-3
    Strawberry Shortcake (Better Homes & Gardens)

    Ingredients:
    • 1-1/2  cups all-purpose flour
    • 1/4  cup sugar
    • 1  teaspoon baking powder
    • 1/4  teaspoon salt
    • 1/4  teaspoon baking soda
    • 1/3  cup cold butter
    • 1  egg, slightly beaten
    • 1/2  cup dairy sour cream
    • 2  tablespoons milk
    • 5  cups sliced strawberries
    • 3  tablespoons sugar
    • 1  recipe Whipped Cream
    Directions:

    1. Preheat oven to 400 degrees F. Lightly grease a baking sheet; set aside. In a medium bowl combine flour, the 1/4 cup sugar, the baking powder, salt, and baking soda. Using a pastry blender, cut in butter until mixture resembles coarse crumbs. In a small bowl combine egg, sour cream, and milk. Add to flour mixture, stirring with a fork just until moistened.

    2. Drop dough into 8 mounds onto prepared baking sheet. Bake for 12 to 15 minutes or until golden. Transfer to a wire rack and let cool.

    3. Meanwhile, combine 4 cups of the strawberries and the 3 tablespoons sugar. Using a potato masher, mash berries slightly; set aside. To serve, split shortcakes in half; fill with strawberry mixture and whipped cream. Top with remaining sliced strawberries.

    4. Makes 8 shortcakes

    signature

    Thursday, April 1, 2010

    Strawberry Scones

    DSC_0057-3redo

    This isn't the first time I have made these scones and it will certainly not be my last. I love this recipe and cannot thank Jasmine of Confessions of a Cardamom Addict enough!!! She came to my rescue one day when I tweeted looking for a good scone recipe for a school project that my daughter was working on.

    Turns out to be the easiest and most forgiving recipe I have come across in a long, long time!

    DSC_0066-1

    Scones – from "Tamasin's Kitchen Bible" by Tamasin Day-Lewis (converted to imperial measures)

    Yield 12-24 (depending on how you shape them)

    Ingredients:

    3 1/4 cup (450g) All Purpose Flour
    1/2 tsp salt
    1/4 cup (50g) sugar (+ more for sprinkling)

    6 Tbsp (85g) butter (cold)

    and either

    2 tsp baking soda + 2 tsp cream of tartar + 1-1/4 cup (300ml) buttermilk, sour milk, yoghurt or sour cream (mixed together)

    or

    2 tsp baking soda + 4.5 tsp cream of tartar + 1-1/4 cup (300ml) homo milk (full fat) (mixed together)

    1/2 – 3/4 cup strawberries(100g) or other fruit or dried fruit

    Directions:

    • Preheat oven to 425F/220C and line a baking tray with parchment
    • Sift together flour, salt and sugar. Grate/rub in butter and quickly mix in liquid until spongy.
    • Lightly knead until smooth and roll to about 1/2" – 3/4" (1-2 cm) thickness.
    • Cut out scones with a 2" cutter...or whatever size you want, set on prepared tray for 10 minutes. Lightly brush with egg/milk wash and sprinkle with sugar.
    • Bake for 15 minutes or until a nice golden brown. Cool for about 5 minutes on sheet pan then move to rack to cool.

    ***I have made these with blueberries and also dried cranberries with some lemon zest added in. Truly a wonderfully versatile recipe!

    ****For anyone following Weight Watchers this is a 4 Point item based on the 15 that I made using non-fat plain yogurt.

    signature

    Saturday, February 27, 2010

    Daring Bakers do Tiramisu

    The February 2010 Daring Bakers’ challenge was hosted by Aparna of My Diverse Kitchen and Deeba of Passionate About Baking. They chose Tiramisu as the challenge for the month. Their challenge recipe is based on recipes from The Washington Post, Cordon Bleu at Home and Baking Obsession.

    P1020523 It turned out perfect.  The only thing I will do differently next time is to dip the cookies in the espresso mixture for longer.  I was afraid of them becoming mushy!

    And what an incredible challenge this was!  And not because I screwed anything up this time!  They made us make this from complete 100% scratch.  Right down to  making our own mascarpone cheese.  I had to read through the directions several times just to be sure they didn’t want us making our own vanilla and rum extracts!!!

    I truly loved this challenge and for me it was probably one of the most rewarding.  If I had never done this challenge I would NEVER have made my own mascarpone cheese and it is something that is so delicious, simple and satisfying to do!  Thank you my dear, sweet friend Deeba and Aparna for this wonderful challenge!!!

    P1020514 Mascarpone cheese, zabaglione, pastry cream, and Ladyfinger/Saviardi Biscuits

    Due to time restrictions for me (we are leaving town today for a BMX Race) I only made a small one in a bread pan, but it was truly delicious…

    The recipes for this challenge are presented in the following order:

    A. Tiramisu (includes zabaglione & vanilla pastry cream)
    B. Mascarpone Cheese
    C. Ladyfinger/ Savoiardi Biscuits

    MANDATORY:

    You MUST make your own savoiardi / ladyfinger biscuits and mascarpone cheese with the given recipes. You must also make the zabaglione and pastry cream using the given recipes.
    If diet or health restrictions do not allow you to use these recipes, please go ahead and use one of the alternatives provided or other suitable recipes to make them, but please include links to the original recipe in your DB post.
    Sponge cake may be not be used as a substitute. After all, a large part of this challenge is making those biscuits.

    VARIATIONS:

    Tiramisu is usually made in square dishes and cut into squares to serve. If you want to be different, please feel free to give full rein to your creativity as to how you want to present, decorate and serve your tiramisu. Make it square, round, as individual servings, or whatever! However, your version of Tiramisu must contain the mascarpone cheese and the savoiardi/ ladyfinger biscuits you made.

    PREPARATION TIME:

    Tiramisu is made up of several components which can be made separately and ahead of time and put together the day before serving.
    Making tiramisu from scratch requires about 2 to 3 days (including refrigeration) from when you start making the mascarpone to the time the tiramisu is served. So this challenge requires some prior planning.

    Please read the instructions as you need to begin making the mascarpone at least a day in advance.
    The zabaglione & pastry cream also need 4 hours to an overnight for chilling, as does the main dessert. The flavours mature after an overnight rest, and the dessert can be kept refrigerated for 2-3 days.
    Once assembled, the tiramisu can be frozen till you need to serve it, in case you are not serving it immediately.

    EQUIPMENT REQUIRED:

    • A double boiler (a stainless steel bowl that fits inside a large saucepan/ pot without touching the bottom will do)
    • Two or three large mixing bowls
    • Whisk
    • A medium sized heavy bottomed pan
    • Fine meshed strainer (to remove lumps from pastry cream, if any)
    • Electric mixer, hand held
    • Serving dish (or dishes) of choice (8" by 8" should be fine)
    • Spatula for folding and spoons as required
    • Plastic wrap/ clingfilm
    • Baking sheets
    • Parchment paper or nonstick liners
    • Pastry bag (can be disposable)
    • Plain 3/4" pastry bag tip or cut the end of pastry bag to this size (If you don’t have a pastry bag and/or tips, you can use a Ziploc bag with the corner snipped off)
    • Oven
    • Cooling rack
    • Thin-bladed spatula for removing ladyfinger biscuits from the baking sheets
    • Instant-read thermometer (optional)
    • Strainer
    • Cheesecloth or cotton napkin for draining mascarpone
    • Fine-mesh strainer for shaking cocoa powder on tiramisu

    TIRAMISU

    (Recipe source: Carminantonio's Tiramisu from The Washington Post, July 11 2007 )
    This recipe makes 6 servings

    Ingredients:
    For the zabaglione:
    2 large egg yolks
    3 tablespoons sugar/50gms
    1/4 cup/60ml Marsala wine (or port or coffee)
    1/4 teaspoon/ 1.25ml vanilla extract
    1/2 teaspoon finely grated lemon zest

    For the vanilla pastry cream:
    1/4 cup/55gms sugar
    1 tablespoon/8gms all purpose flour
    1/2 teaspoon finely grated lemon zest
    1/2 teaspoon/ 2.5ml vanilla extract
    1 large egg yolk
    3/4 cup/175ml whole milk

    For the whipped cream:
    1 cup/235ml chilled heavy cream (we used 25%)
    1/4 cup/55gms sugar
    1/2 teaspoon/ 2.5ml vanilla extract

    To assemble the tiramisu:
    2 cups/470ml brewed espresso, warmed
    1 teaspoon/5ml rum extract (optional)
    1/2 cup/110gms sugar
    1/3 cup/75gms mascarpone cheese
    36 savoiardi/ ladyfinger biscuits (you may use less)
    2 tablespoons/30gms unsweetened cocoa powder

    Method:
    For the zabaglione:
    Heat water in a double boiler. If you don’t have a double boiler, place a pot with about an inch of water in it on the stove. Place a heat-proof bowl in the pot making sure the bottom does not touch the water.
    In a large mixing bowl (or stainless steel mixing bowl), mix together the egg yolks, sugar, the Marsala (or espresso/ coffee), vanilla extract and lemon zest. Whisk together until the yolks are fully blended and the mixture looks smooth.
    Transfer the mixture to the top of a double boiler or place your bowl over the pan/ pot with simmering water. Cook the egg mixture over low heat, stirring constantly, for about 8 minutes or until it resembles thick custard. It may bubble a bit as it reaches that consistency.
    Let cool to room temperature and transfer the zabaglione to a bowl. Cover and refrigerate at least 4 hours or overnight, until thoroughly chilled.

    For the pastry cream:
    Mix together the sugar, flour, lemon zest and vanilla extract in a medium heavy-bottomed saucepan. To this add the egg yolk and half the milk. Whisk until smooth.
    Now place the saucepan over low heat and cook, stirring constantly to prevent the mixture from curdling.
    Add the remaining milk a little at a time, still stirring constantly. After about 12 minutes the mixture will be thick, free of lumps and beginning to bubble. (If you have a few lumps, don’t worry. You can push the cream through a fine-mesh strainer.)
    Transfer the pastry cream to a bowl and cool to room temperature. Cover with plastic film and refrigerate at least 4 hours or overnight, until thoroughly chilled.

    For the whipped cream:
    Combine the cream, sugar and vanilla extract in a mixing bowl. Beat with an electric hand mixer or immersion blender until the mixture holds stiff peaks. Set aside.

    To assemble the tiramisu:
    Have ready a rectangular serving dish (about 8" by 8" should do) or one of your choice.
    Mix together the warm espresso, rum extract and sugar in a shallow dish, whisking to mix well. Set aside to cool.
    In a large bowl, beat the mascarpone cheese with a spoon to break down the lumps and make it smooth. This will make it easier to fold. Add the prepared and chilled zabaglione and pastry cream, blending until just combined. Gently fold in the whipped cream. Set this cream mixture aside.

    Now to start assembling the tiramisu.
    Workings quickly, dip 12 of the ladyfingers in the sweetened espresso, about 1 second per side. They should be moist but not soggy. Immediately transfer each ladyfinger to the platter, placing them side by side in a single row. You may break a lady finger into two, if necessary, to ensure the base of your dish is completely covered. (I should have soaked mine longer!!!)
    Spoon one-third of the cream mixture on top of the ladyfingers, then use a rubber spatula or spreading knife to cover the top evenly, all the way to the edges.
    Repeat to create 2 more layers, using 12 ladyfingers and the cream mixture for each layer. Clean any spilled cream mixture; cover carefully with plastic wrap and refrigerate the tiramisu overnight.
    To serve, carefully remove the plastic wrap and sprinkle the tiramisu with cocoa powder using a fine-mesh strainer or decorate as you please. Cut into individual portions and serve.

    MASCARPONE CHEESE

    (Source: Vera’s Recipe for Homemade Mascarpone Cheese)
    This recipe makes 12oz/ 340gm of mascarpone cheese

    Ingredients:
    474ml (approx. 500ml)/ 2 cups whipping (36 %) pasteurized (not ultra-pasteurized), preferably organic cream (between 25% to 36% cream will do)
    1 tablespoon fresh lemon juice

    Method:

    Bring 1 inch of water to a boil in a wide skillet. Reduce the heat to medium-low so the water is barely simmering. Pour the cream into a medium heat-resistant bowl, then place the bowl into the skillet. Heat the cream, stirring often, to 190 F. If you do not have a thermometer, wait until small bubbles keep trying to push up to the surface.
    It will take about 15 minutes of delicate heating. Add the lemon juice and continue heating the mixture, stirring gently, until the cream curdles. Do not expect the same action as you see during ricotta cheese making. All that the whipping cream will do is become thicker, like a well-done crème anglaise. It will cover a back of your wooden spoon thickly. You will see just a few clear whey streaks when you stir. Remove the bowl from the water and let cool for about 20 minutes. Meanwhile, line a sieve with four layers of dampened cheesecloth and set it over a bowl. Transfer the mixture into the lined sieve. Do not squeeze the cheese in the cheesecloth or press on its surface (be patient, it will firm up after refrigeration time). Once cooled completely, cover with plastic wrap and refrigerate (in the sieve) overnight or up to 24 hours.
    Vera’s notes: The first time I made mascarpone I had all doubts if it’d been cooked enough, because of its custard-like texture. Have no fear, it will firm up beautifully in the fridge, and will yet remain lusciously creamy.
    Keep refrigerated and use within 3 to 4 days.

    LADYFINGERS/ SAVOIARDI BISCUITS
    (Source: Recipe from Cordon Bleu At Home)
    This recipe makes approximately 24 big ladyfingers or 45 small (2 1/2" to 3" long) ladyfingers.

    Ingredients:
    3 eggs, separated
    6 tablespoons /75gms granulated sugar
    3/4 cup/95gms cake flour, sifted (or 3/4 cup all purpose flour + 2 tbsp corn starch)
    6 tablespoons /50gms confectioner's sugar,

    Method:

    Preheat your oven to 350 F (175 C) degrees, then lightly brush 2 baking sheets with oil or softened butter and line with parchment paper.
    Beat the egg whites using a hand held electric mixer until stiff peaks form. Gradually add granulate sugar and continue beating until the egg whites become stiff again, glossy and smooth.
    In a small bowl, beat the egg yolks lightly with a fork and fold them into the meringue, using a wooden spoon. Sift the flour over this mixture and fold gently until just mixed. It is important to fold very gently and not overdo the folding. Otherwise the batter would deflate and lose volume resulting in ladyfingers which are flat and not spongy.
    Fit a pastry bag with a plain tip (or just snip the end off; you could also use a Ziploc bag) and fill with the batter. Pipe the batter into 5" long and 3/4" wide strips leaving about 1" space in between the strips.
    Sprinkle half the confectioner's sugar over the ladyfingers and wait for 5 minutes. The sugar will pearl or look wet and glisten. Now sprinkle the remaining sugar. This helps to give the ladyfingers their characteristic crispness.
    Hold the parchment paper in place with your thumb and lift one side of the baking sheet and gently tap it on the work surface to remove excess sprinkled sugar.
    Bake the ladyfingers for 10 minutes, then rotate the sheets and bake for another 5 minutes or so until the puff up, turn lightly golden brown and are still soft.
    Allow them to cool slightly on the sheets for about 5 minutes and then remove the ladyfingers from the baking sheet with a metal spatula while still hot, and cool on a rack.
    Store them in an airtight container till required. They should keep for 2 to 3 weeks.

    Thanks again Deeba and Aparna!

    signature

    Friday, December 18, 2009

    12 Days of Cookies – The very last day…sort of

    image

    This wonderful event, in it’s second year, is the brain child of Andrea of Andrea's Recipes, but this year is being organized and ran by Sandy of At the Baker's Bench.

    How I got asked to be involved with this incredible group is beyond me but all the thanks goes to Kelly of Sass & Veracity and after last year I sure earned my way in the hard way! There are 10 of us that have decided to do The 12 Days of Cookies – A bon appétit cookie extravaganza. We will be choosing, baking, tasting, blogging and sharing with you a cookie a day for the first 12 days of December.
    These cookies are coming from bon appetit's Holiday Cookie-a-Day Slideshow.

    These are my partners in crime. We will all be choosing different cookies and surprising each other. How fun is that???? Be sure to check out their selections for the day!

    Andrea of Andrea's Recipes
    Claire of The Barefoot Kitchen
    Courtney of Coco Cooks
    Di of Di's Kitchen Notebook
    Kelly of Sass & Veracity
    Michelle of Big Black Dogs
    RJ of Flamingo Musings
    Sandy of At the Baker's Bench
    Tiffany of The Nesting Project

    P1020348

    So for my 12th and final cookie (even though I am days over the deadline :() I chose to make something that wasn’t even part of the bon appétit Holiday Cookie-a-Day Slideshow.  I really need to feel like I have completed the challenge of 12 Days of Cookies though. This cookie is something that I needed to make for one of my girl’s class parties.  And one that she could help me with!!!  It’s easy and comes together really fast too…Man, did I ever cheat on this one!

    Chocolate Haystacks (www.bigoven.com)

    Ingredients

    • 1/2 cup butter or marg.
    • 2 cups sugar
    • 1/2 cup milk
    • 7 tblsp. cocoa.
    • 3 cups rolled oats
    • 1 tsp. vanilla
    • 1/2 cup coconut.

    Preparation

    Boil first 4 ingredients for 1 minute

    Then add last 3 ingredients

    Drop by teaspoonfuls onto foil lined cookie sheet and refrigerate.

    Would I make these again?  Oh yes I would.  Took me about 10 minutes to pull it all together and the kids loved them…

    Forgive me for cheating and not doing another bon appétit one but the girl’s really did want to help!!!

    Friday, November 27, 2009

    Daring Baker Challenge: Cannoli!!!

    The November 2009 Daring Bakers Challenge was chosen and hosted by Lisa Michele of Parsley, Sage, Desserts and Line Drives. She chose the Italian Pastry, Cannolo (Cannoli is plural), using the cookbooks Lidia’s Italian-American Kitchen by Lidia Matticchio Bastianich and The Sopranos Family Cookbook by Allen Rucker; recipes by Michelle Scicolone, as ingredient/direction guides. She added her own modifications/changes, so the recipe is not 100% verbatim from either book.
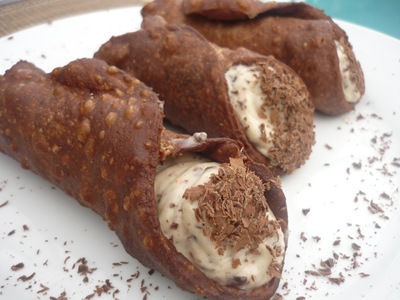
    P1020146

    I was so excited about this challenge!  I even did it the weekend before it was due and anyone that knows me knows that this is unheard of.  I absolutely loved these.  I made a few mistakes and changes along the way…I thought the recipe said 1 cup of cocoa???!!! and it only called for 1 tsp, (I ended up adding about 2 Tbsp) hence the darkness of my dough and then I made up the filling as I went along and it turned out perfect!

    Below is the recipe as written but for my filling I used 1 lb of mascarpone cheese, 1 cup sifted confectioners sugar (to taste), 1 tsp vanilla extract and lots of grated Dark semi-sweet Callebaut chocolate!

    Don’t be afraid of these!  This was an incredible recipe and experience.  Oh I also used a one inch dowel cut into 8 inch pieces for my forms…easy as can be!

    Equipment:
    Cannoli forms/tubes - optional, but recommended if making traditional shaped cannoli. Dried cannelloni pasta tubes work just as well!
    Deep, heavy saucepan, enough to hold at least 2-3-inches of oil or deep fryer
    Deep fat frying thermometer. although the bread cube or bit of dough test will work fine.
    Metal tongs
    Brass or wire skimmer OR large slotted spoon
    Pastry bag with large star or plain tip, but a snipped ziplock bag, butter knife or teaspoon will work fine.
    Cooling rack
    Paper bags or paper towels
    Pastry Brush
    Cheesecloth
    Sieve or fine wire mesh strainer
    Electric Mixer, stand or hand, optional, as mixing the filling with a spoon is fine.
    Food Processor or Stand Mixer – also optional, since you can make the dough by hand, although it takes more time.
    Rolling pin and/or Pasta roller/machine
    Pastry or cutting board
    Round cutters - The dough can also be cut into squares and rolled around the cannoli tube prior to frying. If making a stacked cannoli, any shaped cutter is fine, as well as a sharp knife.
    Mixing bowl and wooden spoon if mixing filling by hand
    Plastic Wrap/Clingfilm
    Tea towels or just cloth towels

    Required: Must make cannoli dough and shells. If you don’t have or do not want to purchase cannoli forms, which I would never ask of any of you, you could simply cut out circles, squares, or any shapes you want and stack them with the filling of your choice to make stacked cannoli's aka Cannolipoleons (directions below). If desired, you can channel MacGuyver and fashion something heat proof to get traditional shaped cannoli (6-8 inch sawed off lengths of a wooden broom stick or cane, sanded down and oiled, is THE authentic cannoli form!), or non-traditional shapes such as creating a form to make bowls, or even using cream horns if you happen to have them. Mini cannoli would be great too, and I've provided links to retailers of cannoli forms of all sizes.

    Also, for those who don't like to cook or bake with alcohol - grape juice, cranberry juice, pomegranate juice, apple juice..any sweet juice of a fruit, especially ones used in or to make wine, can be substituted. Just add a little more vinegar to insure you get enough acid to relax the dough

    Variations: The filling is YOUR choice! Anything you want to fill them with is perfectly fine, sweet or savory, or you can use the filling recipe provided – making whatever changes you want to it. Cannoli would make a great addition to a Thanksgiving dessert table/spread. In many Italian households, during the holidays, cannoli is always part of the dessert offerings. You could also make a Thanksgiving themed cannoli, like pumpkin cannoli (I came up with a great pumpkin filling recipe below) or apples, pecans, walnuts, any dried fruits etc. An idea to gussy up your cannoli is; dipping the rims of the shell in melted chocolate and rolling in chopped nuts or sprinkles, then letting them set prior to filling. Dipping or pressing mini chocolate chips into the filled ends OR just stirring mini chocolate chips into the filling prior to stacking or filling whatever shaped shells you come up with, is another great idea and makes a nice presentation The sky is the limit here, be creative! Naturally, if you have any dietary restrictions, by all means, go with it. I’ve provided a link to a gluten-free cannoli recipe and a slightly savory vegan cannoli recipe to help get you started.

    Bonus option: Make your own ricotta and/or mascarpone cheese! http://lisamichele.wordpress.com/2009/05/04/eating-my-curds-and-ditching...
    http://www.bakingobsession.com/2009/05/02/homemade-mascarpone-cheese/

    Technically, I know, this is not baking, and if you prefer to steer clear of the deep fry, you can bake the shell. You won’t get the snappy, blistery texture and appearance that make cannoli so special, but I’m sure it’ll taste good nonetheless. Here’s a link where the cook bakes some of his cannoli shells: http://www.ifood.tv/network/cannoli/recipes

    Lidisano’s Cannoli
    Makes 22-24 4-inch cannoli
    Prep time:
    Dough – 2 hours and 10-20 minutes, including resting time, and depending on whether you do it by hand or machine.
    Filling – 5-10 minutes plus chilling time (about 2 hours or more)
    Frying – 1-2 minutes per cannoli
    Assemble – 20–30 minutes

    RECIPE NOTE: THE EQUIVALENTS FROM THIS RECIPE WERE PREPARED USING THIS CONVERSION SITE: http://www.gourmetsleuth.com/index.asp.

    CANNOLI SHELLS
    2 cups (250 grams/16 ounces) all-purpose flour
    2 tablespoons(28 grams/1 ounce) sugar
    1 teaspoon (5 grams/0.06 ounces) unsweetened baking cocoa powder
    1/2 teaspoon (1.15 grams/0.04 ounces) ground cinnamon
    1/2 teaspoon (approx. 3 grams/0.11 ounces) salt
    3 tablespoons (42 grams/1.5 ounces) vegetable or olive oil
    1 teaspoon (5 grams/0.18 ounces) white wine vinegar
    Approximately 1/2 cup (approx. 59 grams/approx. 4 fluid ounces/approx. 125 ml) sweet Marsala or any white or red wine you have on hand
    1 large egg, separated (you will need the egg white but not the yolk)
    Vegetable or any neutral oil for frying – about 2 quarts (8 cups/approx. 2 litres)
    1/2 cup (approx. 62 grams/2 ounces) toasted, chopped pistachio nuts, mini chocolate chips/grated chocolate and/or candied or plain zests, fruits etc.. for garnish
    Confectioners' sugar

    Note - If you want a chocolate cannoli dough, substitute a few tablespoons of the flour (about 25%) with a few tablespoons of dark, unsweetened cocoa powder (Dutch process) and a little more wine until you have a workable dough (Thanks to Audax).

    CANNOLI FILLING
    2 lbs (approx. 3.5 cups/approx. 1 kg/32 ounces) ricotta cheese, drained
    1 2/3 cups cup (160 grams/6 ounces) confectioner’s sugar, (more or less, depending on how sweet you want it), sifted
    1/2 teaspoon (1.15 grams/0.04 ounces) ground cinnamon
    1 teaspoon (4 grams/0.15 ounces) pure vanilla extract or the beans from one vanilla bean
    3 tablespoons (approx. 28 grams/approx. 1 ounce) finely chopped good quality chocolate of your choice
    2 tablespoons (12 grams/0.42 ounces) of finely chopped, candied orange peel, or the grated zest of one small to medium orange
    3 tablespoons (23 grams/0.81 ounce) toasted, finely chopped pistachios

    Note - If you want chocolate ricotta filling, add a few tablespoons of dark, unsweetened cocoa powder to the above recipe, and thin it out with a few drops of warm water if too thick to pipe.

    DIRECTIONS FOR SHELLS:
    1. In the bowl of an electric stand mixer or food processor, combine the flour, sugar, cocoa, cinnamon, and salt. Stir in the oil, vinegar, and enough of the wine to make a soft dough. Turn the dough out onto a lightly floured surface and knead until smooth and well blended, about 2 minutes. Shape the dough into a ball. Cover with plastic wrap and let rest in the fridge from 2 hours to overnight.

    2 Cut the dough into two pieces. Keep the remaining dough covered while you work. Lightly flour a large cutting or pastry board and roll the dough until super thin, about 1/16 to 1/8” thick (An area of about 13 inches by 18 inches should give you that). Cut out 3 to 5-inch circles (3-inch – small/medium; 4-inch – medium/large; 5-inch;- large. Your choice). Roll the cut out circle into an oval, rolling it larger and thinner if it’s shrunk a little.

    3 Oil the outside of the cannoli tubes (You only have to do this once, as the oil from the deep fry will keep them well, uhh, oiled..lol). Roll a dough oval from the long side (If square, position like a diamond, and place tube/form on the corner closest to you, then roll) around each tube/form and dab a little egg white on the dough where the edges overlap. (Avoid getting egg white on the tube, or the pastry will stick to it.) Press well to seal. Set aside to let the egg white seal dry a little.

    4. In a deep heavy saucepan, pour enough oil to reach a depth of 3 inches, or if using an electric deep-fryer, follow the manufacturer's directions. Heat the oil to 375°F (190 °C) on a deep fry thermometer, or until a small piece of the dough or bread cube placed in the oil sizzles and browns in 1 minute. Have ready a tray or sheet pan lined with paper towels or paper bags.

    5. Carefully lower a few of the cannoli tubes into the hot oil. Do not crowd the pan. Fry the shells until golden, about 2 minutes, turning them so that they brown evenly.

    8. Lift a cannoli tube with a wire skimmer or large slotted spoon, out of the oil. Using tongs, grasp the cannoli tube at one end. Very carefully remove the cannoli tube with the open sides straight up and down so that the oil flows back into the pan. Place the tube on paper towels or bags to drain. Repeat with the remaining tubes. While they are still hot, grasp the tubes with a potholder and pull the cannoli shells off the tubes with a pair of tongs, or with your hand protected by an oven mitt or towel. Let the shells cool completely on the paper towels. Place shells on cooling rack until ready to fill.

    9. Repeat making and frying the shells with the remaining dough. If you are reusing the cannoli tubes, let them cool before wrapping them in the dough.

    Pasta Machine method:
    1. Divide the dough into 4 equal pieces. Starting at the middle setting, run one of the pieces of dough through the rollers of a pasta machine. Lightly dust the dough with flour as needed to keep it from sticking. Pass the dough through the machine repeatedly, until you reach the highest or second highest setting. The dough should be about 4 inches wide and thin enough to see your hand through

    2. Continue rolling out the remaining dough. If you do not have enough cannoli tubes for all of the dough, lay the pieces of dough on sheets of plastic wrap and keep them covered until you are ready to use them.

    3, Roll, cut out and fry the cannoli shells as according to the directions above.

    For stacked cannoli:
    1. Heat 2-inches of oil in a saucepan or deep sauté pan, to 350-375°F (176 - 190 °C).

    2. Cut out desired shapes with cutters or a sharp knife. Deep fry until golden brown and blistered on each side, about 1 – 2 minutes. Remove from oil with wire skimmer or large slotted spoon, then place on paper towels or bags until dry and grease free. If they balloon up in the hot oil, dock them lightly prior to frying. Place on cooling rack until ready to stack with filling.

    DIRECTIONS FOR FILLING:
    1. Line a strainer with cheesecloth. Place the ricotta in the strainer over a bowl, and cover with plastic wrap and a towel. Weight it down with a heavy can, and let the ricotta drain in the refrigerator for several hours to overnight.

    2. In a bowl with electric mixer, beat ricotta until smooth and creamy. Beat in confectioner’s sugar, cinnamon, vanilla and blend until smooth. Transfer to another bowl and stir in chocolate, zest and nuts. Chill until firm.(The filling can be made up to 24 hours prior to filling the shells. Just cover and keep refrigerated).

    ASSEMBLE THE CANNOLI:
    1. When ready to serve..fill a pastry bag fitted with a 1/2-inch plain or star tip, or a ziplock bag, with the ricotta cream. If using a ziplock bag, cut about 1/2 inch off one corner. Insert the tip in the cannoli shell and squeeze gently until the shell is half filled. Turn the shell and fill the other side. You can also use a teaspoon to do this, although it’s messier and will take longer.

    2. Press or dip cannoli in chopped pistachios, grated chocolate/mini chocolate chips, candied fruit or zest into the cream at each end. Dust with confectioner’s sugar and/or drizzles of melted chocolate if desired.

    TIPS AND NOTES:
    - Dough must be stiff and well kneaded

    - Rolling the dough to paper thinness, using either a rolling pin or pasta machine, is very important. If the dough is not rolled thin enough, it will not blister, and good cannoli should have a blistered surface.

    - Initially, this dough is VERY stubborn, but keep rolling, it eventually gives in. Before cutting the shapes, let the dough rest a bit, covered, as it tends to spring back into a smaller shapes once cut. Then again, you can also roll circles larger after they’re cut, and/or into ovals, which gives you more space for filling.

    - Your basic set of round cutters usually doesn’t contain a 5-inch cutter. Try a plastic container top, bowl etc, or just roll each circle to 5 inches. There will always be something in your kitchen that’s round and 5-inches if you want large cannoli.

    - Oil should be at least 3 inches deep and hot – 360°F-375°F, or you’ll end up with greasy shells. I prefer 350°F - 360°F because I felt the shells darkened too quickly at 375°F.

    - If using the cannoli forms, when you drop the dough on the form into the oil, they tend to sink to the bottom, resulting in one side darkening more. Use a slotted spoon or skimmer to gently lift and roll them while frying.

    - DO NOT crowd the pan. Cannoli should be fried 2-4 at a time, depending on the width of your saucepan or deep fryer. Turn them once, and lift them out gently with a slotted spoon/wire skimmer and tongs. Just use a wire strainer or slotted spoon for flat cannoli shapes.

    - When the cannoli turns light brown - uniform in color, watch it closely or remove it. If it’s already a deep brown when you remove it, you might end up with a really dark or slightly burnt shell.

    - Depending on how much scrap you have left after cutting out all of your cannoli shapes, you can either fry them up and sprinkle with confectioner’s sugar for a crispy treat, or let the scraps rest under plastic wrap and a towel, then re-roll and cut more cannoli shapes.

    - Push forms out of cannoli very gently, being careful not to break the shells as they are very delicate. DO NOT let the cannoli cool on the form, or you may never get it off without it breaking. Try to take it off while still hot. Hold it with a cloth in the center, and push the form out with a butter knife or the back of a spoon.

    - When adding the confectioner’s sugar to the filling..TASTE. You may like it sweeter than what the recipe calls for, or less sweet, so add in increments.

    - Fill cannoli right before serving! If you fill them an hour or so prior, you’ll end up with soggy cannoli shells.

    - If you want to prepare the shells ahead of time, store them in an airtight container, then re-crisp in a 350°F (176 °C) oven for a few minutes, before filling.

    - Practice makes perfect. My first batch of shells came out less than spectacular, and that’s an understatement. As you go along, you’ll see what will make them more aesthetically pleasing, and adjust accordingly when rolling. My next several batches turned out great. Don’t give up!!

    Tuesday, September 1, 2009

    Chocolate and Key Lime Cupcakes

    I’ve been having a bit of a block lately.  I can’t write.  I’m still cooking and baking but nothing seems to be inspiring me to write (or “right” about it. LOL!!!). 

    I keep putting it down to the season.  I know it sounds weird to all of you northerners but here in Southwest Florida in the months of August and September we are a virtual dead zone of fresh produce!  It is just too stinking hot outside for anything to grow let alone thrive…I will be planting my garden this month so hopefully that will help give me a badly needed boost!  Until then I offer you some delicious chocolate and key lime cupcakes…

    P1010822

    Chocolate and Key Lime Cupcakes

    Ingredients:

    Cupcakes:
    1 1/2 c. all-purpose flour
    1 c. sugar
    1/4 c. baking cocoa
    1 tsp. baking soda
    1/2 tsp. salt
    1 c. water
    1/3 c. vegetable oil
    1 Tbs. white vinegar
    1 tsp. vanilla

    Filling:
    1 package (8 oz.) cream cheese, softened
    1/3 c. sugar
    1 egg
    1/8 tsp. salt
    1/4 cup of fresh squeezed key lime juice
    zest of one key lime

    Directions:

    In a bowl, beat cream cheese. Add key lime juice, zest, sugar, egg, salt. Mix well. Set aside.

    For cupcakes, combine flour, sugar, cocoa, baking soda, and salt. Add water, oil, vinegar, and vanilla. Mix well. Fill paper-lined muffin cups half full with batter. Top each with 2 Tbs. of cream cheese mixture and then top with more chocolate batter to cover the cream cheese.

    Bake at 350º for 25-30 minutes. Cool 10 minutes and remove from pan. This makes 12

    P1010815

    These were truly delicious.  I tossed around whether it should be a white cupcake or chocolate but my helpers decided it HAD to be chocolate.  Glad I listened to them.  Some of them caved in but that’s because I was a little over zealous in my filling!!!

    Friday, May 29, 2009

    Banana Bread with Brown Butter and Caramel

    This is the third recipe I have written using the caramel sauce from the DB Caramel Cake. If you love the flavor of caramel you simply have to make some to have on hand at all times. It’s easy enough to make and then any time that you want to add a wonderful caramel flavor to anything you have some in your fridge already!

    P1010458

    CARAMEL SYRUP (Shuna Fish Lydon of Eggbeater)

    2 cups sugar
    1/2 cup water
    1 cup water (for "stopping" the caramelization process)
    In a small stainless steel saucepan, with tall sides, mix water and sugar until mixture feels like wet sand. Brush down any stray sugar crystals with wet pastry brush. Turn on heat to highest flame. Cook until smoking slightly: dark amber.
    When color is achieved, very carefully pour in one cup of water. Caramel will jump and sputter about! It is very dangerous, so have long sleeves on and be prepared to step back.
    Whisk over medium heat until it has reduced slightly and feels sticky between two fingers. {Obviously wait for it to cool on a spoon before touching it.}
    Note: For safety reasons, have ready a bowl of ice water to plunge your hands into if any caramel should land on your skin.

    Alright now that you have the caramel sauce at your disposal you HAVE GOT TO MAKE THIS BANANA BREAD!!!!!!

    I had some bananas on hand that were definitely passed the comfortable eating stage but were not to the trash stage…yet. So I asked the girls what they wanted. Banana bread, banana cake, banana cookies etc…

    They decided on banana bread so banana bread it was. Only this time I still had that caramel sauce in my head. And during the week Elle from Elle’s New England Kitchen had posted a recipe for Browned Butter Blueberry Maple Muffins. While her muffins looked great the browned butter thing was what stuck in my mind.

    And that folks was the inspiration behind this wonderful banana bread!!!

    Banana Bread (all recipes.com)

    Preheat oven to 350

    Ingredients:

    1/2 cup butter
    2 cups AP Flour
    1 tsp baking soda
    1/4 tsp salt
    3/4 cup brown sugar
    2 eggs, beaten
    2 Tbsp caramel sauce (see above)
    2-1/3 cup bananas, mashed
    1 tsp vanilla extract
    1/2 pecans, chopped

    1. Lightly grease a 9x5 inch loaf pan.
    2. Melt the butter in a small pan, letting it boil until it starts to brown and smell nutty. Don’t let it burn. Stop it when it gets a deep brown color.There will be sediment at the bottom of the pan, so pour the butter through a wire mesh strainer and set aside to cool.
    3. In a large bowl, combine flour, baking soda and salt. In a separate bowl, stir together the browned butter and brown sugar. Stir in eggs, mashed bananas vanilla, and pecans until well blended. Stir banana mixture into flour mixture; stir just to moisten. Pour batter into prepared loaf pan.
    4. Bake in preheated oven for 60 to 65 minutes, until a toothpick inserted into center of the loaf comes out clean. Let bread cool in pan for 10 minutes, then turn out onto a wire rack.

    This bread was delicious and I will be making this again and again!!! I cut it as soon as it was cooled and it tasted great but the real flavor came through the next day!!!

    As Always…

    Happy Entertaining!!!

    Judy
    www.nofearentertaining.com

    Monday, May 18, 2009

    Oatmeal Cookies with Browned Butter Icing

    resized cookie

    Finally you say…so after teasing you and badgering you with pictures and descriptions on both Facebook and Twitter, promising to post it for you over the weekend, here it is. This was a wonderful, wonderful way to eat some healthy for you as in oatmeal cookies and junk them right up but in a very, very good way!

    Now, there are several steps to making this and they look complicated but they really aren’t. I would think that if you really wanted to you could use the ice cream caramel syrup that they sell in the grocery store but if you make this caramel syrup you will be able to make caramels with the leftovers! I actually had the leftover caramel syrup and the frosting from the Caramel Cake that I made for one of my gf, Kathy, last week!

    CARAMEL SYRUP (Shuna Fish Lydon of Eggbeater)

    2 cups sugar
    1/2 cup water
    1 cup water (for "stopping" the caramelization process)
    In a small stainless steel saucepan, with tall sides, mix water and sugar until mixture feels like wet sand. Brush down any stray sugar crystals with wet pastry brush. Turn on heat to highest flame. Cook until smoking slightly: dark amber.
    When color is achieved, very carefully pour in one cup of water. Caramel will jump and sputter about! It is very dangerous, so have long sleeves on and be prepared to step back.
    Whisk over medium heat until it has reduced slightly and feels sticky between two fingers. {Obviously wait for it to cool on a spoon before touching it.}
    Note: For safety reasons, have ready a bowl of ice water to plunge your hands into if any caramel should land on your skin.

    Once you have the caramel cooked you can go ahead with the frosting once it has cooled.

    CARAMELIZED BUTTER FROSTING (Shuna Fish Lydon of Eggbeater)

    • 12 tablespoons unsalted butter
    • 1 pound confectioner’s sugar, sifted
    • 4-6 tablespoons heavy cream
    • 2 teaspoons vanilla extract
    • 2-4 tablespoons caramel syrup
    • Kosher or sea salt to taste


    Cook butter until brown. Pour through a fine meshed sieve into a heatproof bowl, set aside to cool.
    Pour cooled brown butter into mixer bowl.
    In a stand mixer fitted with a paddle or whisk attachment, add confectioner's sugar a little at a time. When mixture looks too chunky to take any more, add a bit of cream and or caramel syrup. Repeat until mixture looks smooth and all confectioner's sugar has been incorporated. Add salt to taste.

    Note: Caramelized butter frosting will keep in fridge for up to a month.
    To smooth out from cold, microwave a bit, then mix with paddle attachment until smooth and light

    The cookies I made to go with this are the really simple and straight forward. I took the one from the top of the Quaker Oats can and just omitted the raisins. I wanted to other flavors messing with the frosting!

    Oatmeal Cookies (adapted from the lid to the Quaker Oats canister)

    • 1/2 pound (2 sticks) margarine or butter, softened
    • 1 cup firmly packed brown sugar
    • 1/2 cup granulated sugar
    • 2 eggs
    • 1 teaspoon vanilla
    • 1-1/2 cups all-purpose flour
    • 1 teaspoon baking soda
    • 1 teaspoon ground cinnamon
    • 1/2 teaspoon salt (optional)
    • 3 cups Quaker Oats (quick or old fashioned, uncooked)

    Heat oven to 350°F.

    In large bowl, beat together margarine and sugars with electric mixer until creamy. Add eggs and vanilla; beat well. In medium bowl, combine flour, baking soda, cinnamon and salt; mix well. Add to margarine mixture; mix well. Stir in oats and raisins; mix well.

    Drop by rounded tablespoonfuls onto ungreased cookie sheets.

    Bake 10 to 12 minutes or until light golden brown. Cool 1 minute on cookie sheets; remove to wire rack. Cool completely. Store tightly covered.

    I really can’t say enough about these cookies. They should sell these everywhere…hey I should sell these everywhere!!! Incredible flavor combination that should be repeated and repeated!

    As Always…

    Happy Entertaining!!!

    Judy
    www.nofearentertaining.com

    Wednesday, May 13, 2009

    First of the season Georgia Peaches and my favorite pie!

    I love peach pie. One of my favorite desserts. Fortunately for me my Mother-in-Law makes the best one I have ever had, too bad she lives so far away!!!

    This pie was inspired by my love of peach pie, each little bite tastes just like summer to me!

    peach pie flickr

    Peach Pie Crumble (adapted from RecipeLand.com)

    Ingredients:

    3 Tbsp AP Flour
    1/3 Cup sugar
    1/2 tsp cinnamon
    3 Cups peaches, skinned and sliced

    topping:

    1/2 Cup brown sugar
    1/3 Cup AP flour
    1/3 Cup Rolled Oats
    2 Tbsp butter

    Directions:

    • Preheat oven and baking sheet to 375 degrees.
    • In a large bowl, combine flour, sugar and cinnamon; stir in peaches and toss to coat well.
    • Pour mixture into pie crust.
    • For topping, in a small bowl, combine brown sugar, flour and rolled oats.
    • Cut in butter until crumbly.
    • Sprinkle topping over pie.
    • Bake on preheated baking sheet for 40 minutes or until golden brown.
    • Serve warm or cold.

    As Always…

    Happy Entertaining!!!

    Judy
    www.nofearentertaining.com

    Monday, May 4, 2009

    Lemon Curd and Pop Tarts

    I love lemon.  Anything made with lemon will soon turn into my favorite thing.  I love lemon cakes, tarts, muffins, pies and now even Pop Tarts!!!  For our monthly Pot Luck I made another Limón cello Cheesecake but this time I made a delicious Lemon Curd to go on top.  There was a ton of lemon curd left over but I just knew I would come up with a good use for it.

    Then over the weekend we were in Costco and the girl’s saw some Pop Tarts and asked if they could have them.  Once I finished laughing and told them no I realized that they had given me a great idea!!!  I would use some leftover Lemon Curd to make them Homemade Pop Tarts. 

    P1010291

    Fresh Lemon Curd (Meeta at What’s For Lunch, Honey? with a lot more info on making lemon curd!)

    Ingredients
    Printable version of recipe here.(link directly to Meeta’s site)

    4 organic lemon, zest and juice
    110g unsalted butter, cut into pieces (1/2 cup)
    4 eggs, beaten
    450g fine granulated sugar (2 1/4 cups)

    Method

    1. Set a fine strainer over a medium bowl, then set aside.
    2. In a medium sized saucepan whisk together the grated lemon zest and juice, sugar and eggs until incorporated and the sugar has dissolved.
    3. Place the saucepan over medium heat and gently cook the mixture, stirring with a wooden spoon, until steaming. Make sure the curd does not boil. Stir frequently and continue to cook until the curd has thickened and the curd coats the back of the wooden spoon - approx 3-7 minutes.
    4. Take the curd off the heat and then add the butter, stirring to incorporate it to the curd. Pour the curd mixture through the prepared strainer to make sure there are no lumps in the lemon curd.
    5. Pour into warm sterile jars, cover and seal. Allow to come to room temperature, then refrigerate.

    This lemon curd was simple and delicious and I will definitely be making it again.  It was perfect on top of the cheesecake as well as on bread and toast!!!

    P1010321

    Homemade Lemon Curd Pop Tarts (adapted from Bake Me More and several other blogs that she has mentioned!)

    Ingredients:

    • Pie crust, refrigerated or your favorite homemade pie crust
    • lemon curd (or any jam or jelly you like)
    • Glaze or Egg Wash
    • Sparkling Sugar 

    Directions:

    Preheat the oven to 425 degrees. (Laurel went by the temp setting on the box, the original recipe calls for 450.  I did what she did)

    Unroll one of the pie crusts and square the edges. Cut into rectangles. Place 1 tsp of jam in the center of a rectangle and top with another piece of crust. Crimp all four edges. Repeat until all of the pie crust is used. I also took the rounded edges that I cut off and rolled them together to form more pop-tarts.

    Bake the pop-tarts for about 7 - 8 minutes or until slightly brown. Once cool, pour glaze over and decorate with sugar. If you don’t want to add extra sugar with the glaze, you can use an egg wash on the tops  with some white sugar.

    To Make the Glaze:

    • 1 cup powder sugar
    • milk to thin

    Place powdered sugar in bowl. Pour milk slowly until it has a consistency of really thick syrup.  Drizzle over the cooled Pop Tarts.

    These were so incredibly good.  I have no idea how they stack up against real Pop Tarts because I haven’t tasted them but these will be made again and again. 

    As Always…

    Happy Entertaining!!!

    Judy
    www.nofearentertaining.com

    Thursday, April 16, 2009

    Cinnamon Chocolate Brownies

    cinnamon brownies 005

    The other day I was in a cinnamony mood. I think it’s because first thing in the morning I walked past one of those kiosks that sell the cinnamon pretzels. Poor me it was all I could think about for the rest of the day!!! I was going to make snicker doodles but Lori of The Recipe Girl’s favorite recipe has shortening in it and I was sadly out of shortening! I decided that I would try my hand at Cinnamon Chocolate Brownies and am I ever glad that I did!

    I used my favorite brownie recipe and added 1 Tbsp of cinnamon to the batter. This was a really great treat and although it didn’t fully satisfy my craving (really need to get shortening) it was close!

    Cinnamon Chocolate Brownies (Adapted from Martha Stewart’s Cookies.)

    • 6 tablespoons unsalted butter, plus more for pan
    • 6 ounces bittersweet chocolate, coarsely chopped
    • 1/4 cup unsweetened Dutch-process cocoa powder
    • 1/2 cup all-purpose flour
    • 1/4 cup whole wheat pastry flour
    • 1/4 teaspoon baking powder
    • 1/4 teaspoon coarse salt
    • 1 Tbsp ground cinnamon
    • 1 cup sugar
    • 2 large eggs
    • 2 teaspoons pure vanilla extract

    Preheat oven to 350°. Butter an 8″square baking pan. Line pan with parchment paper, leaving 2 inches hanging over the sides. Butter parchment paper.

    In a heatproof bowl over a pan of simmering water, stir together butter, chocolate, and cocoa powder. Set aside to cool slightly.

    Whisk together flour, baking powder, salt, and cinnamon. Set aside.

    Combine sugar, eggs, and vanilla using an electric mixer with a whisk attachment. Mix on medium speed until pale, about 4 minutes. Add chocolate mixture and mix until combined. Reduce speed to low and add flour mixture, mixing until combined.

    Pour batter into prepared pan. Spread evenly with spatula. Bake about 35 minutes, or until a cake tester comes out with a few crumbs but is not wet. Let cool in pan about 15 minutes.

    Lift brownies out of pan. Cool completely on a wire rack before cutting into squares.

    As Always…

    Happy Entertaining!!!

    Judy
    www.nofearentertaining.com

    Tuesday, March 24, 2009

    A Quick Chocolate Pudding Recipe

    T. was starting to feel a little under the weather the other night and I know what that calls for…Chocolate Pudding. He has always called that his medicine and I have a very quick recipe that makes great pudding in a couple of minutes!

    Chocolate Pudding (adapted from Better Homes and Garden)

    Ingredients
    • 3/4 cup sugar
    • 1/3 cup unsweetened cocoa powder
    • 3 tablespoons cornstarch
    • 3 cups free milk
    • 4 beaten egg yolks
    • 1 tablespoon butter
    • 1-1/2 teaspoons vanilla
    Directions

    1. In a medium heavy saucepan combine sugar, cocoa and cornstarch. Stir in milk. Cook and stir over medium heat until thickened and bubbly. Cook and stir for 2 minutes more. Remove pan from heat. Gradually stir 1 cup of the milk mixture into egg yolks.

    2. Add egg mixture to milk mixture in saucepan. Bring to a gentle boil; reduce heat. Cook and stir for 2 minutes more. Remove pan from heat. Stir in butter and vanilla. Pour pudding into a bowl. Cover surface of pudding with plastic wrap. Serve warm or cold (do not stir during chilling). Makes 4 servings.

    As Always…

    Happy Entertaining!!!

    Judy
    www.nofearentertaining.com

    Monday, February 2, 2009

    Apple Fritters for Breakfast?

    I woke up early Sunday morning and the house was silent. I looked at the time...it wasn't that early but everyone seemed to be snoozing well. Strange thing in my house. Usually at least one other person is up when I am.

    Anyway, my sister is still here until today and I wanted sort of a special kind of breakfast. One that she and her husband would never have. Then I remember what I had seen the other day in Starbuck's! A great big huge, honkin' Apple Fritter. I just knew I had to make them!!!! I didn't want the big ones just the nice tiny little balls all covered with some sweet and gooey icing sugar. This was a wonderful surprise for everyone as they woke up to fresh coffee and homemade apple fritters. Sunday's don't get much better than that do they?

    They were delicious and I will be making these again and again. They came together real quick and were not a fussy donut. They were not a yeast donut but not heavy and cakey at all! I want to try them with some whole wheat flout the next time I make them so will let you know how they turn out then. Until then this recipe will do!!!


    Apple Fritters (From The Picky Apple)

    Fritter:
    • 1 cup all purpose flour
    • 1/4 cup sugar
    • 3/4 teaspoon salt
    • 1 1/2 teaspoons baking powder
    • 1 teaspoon cinnamon
    • 1/3 cup milk
    • 1 egg
    • 1 cup chopped apple
    Glaze:
    • 2 cups powdered sugar
    • 1 1/2 tablespoons milk
    Directions: Combine flour, sugar, salt, baking powder, cinnamon. Stir in milk and egg until just combined. Fold in apple. Pour oil into skillet so that it is approximately 1 1/2 deep. Heat oil on high. Oil is ready when dough floats to top. Carefully add dough to oil in heaping teaspoons. Cook until brown, about 2 minutes, then flip. Cook another 1-2 minutes, until both sides are browned. Transfer briefly to paper towels to absorb excess oil, then transfer to cooling rack. Make glaze by stirring milk and powdered sugar together in a small bowl. Drizzle over apple fritters. Wait approximately 3 minutes for glaze to harden, then flip fritters and drizzle glaze over the other side. Best served warm.
    I am submitting this to BYOB (Bake Your Own Bread) hosted by Sandy of At the Baker's Bench. This is a great challenge to get you baking more of your own baked goods. Better for you and cheaper in the process!
    As Always...

    Happy Entertaining!!!

    Judy
    www.nofearentertaining.com