Showing posts with label Daring Bakers. Show all posts

Friday, November 15, 2013

Day 15 of a Month of Giving Thanks

Today I am thankful for the wonderful and amazing blogging community that has once again pulled together to honor one of our own fallen soldiers.

This post is a tribute to Lisa Cifelli or Lis as most of us knew her.  Lis (co-Founder of the Daring Bakers) passed away unexpectedly this past week and a bunch of us (led by Kelly) have decided that a fitting tribute would be to give her a send off fitting the Queen of all Daring Bakers and bake one of the past challenges!

I did my first Daring Baker Challenge back in November of 2007.  I had no idea what I was doing!  I tried hard and I was able to learn so much. Lis and Ivonne I thank you both for that!  I was very rarely on time and had some amazing mishaps but looking back it was some of the best and happiest years of my life.  Life long freindships were forged out of some of these challenges.  Hard to believe I was at it so long ago.  I did the Challenges for about 2 years but life just got busy and it was late in 2010 that I had to quit (got kicked out...LOL) of the Daring Bakers.

You can find out everything about the Daring Bakers here...Daring Bakers

For this tribute I am revisiting one of my favorite challenges that was first featured in January of 2008.

Thank you Lis for bringing us all together one more time!  You will be sadly missed.  R.I.P...

Lemon Meringue Pie

And once again I was unable to get peaks due to the humidity *sigh*


Saturday, February 27, 2010

Daring Bakers do Tiramisu

The February 2010 Daring Bakers’ challenge was hosted by Aparna of My Diverse Kitchen and Deeba of Passionate About Baking. They chose Tiramisu as the challenge for the month. Their challenge recipe is based on recipes from The Washington Post, Cordon Bleu at Home and Baking Obsession.

P1020523 It turned out perfect.  The only thing I will do differently next time is to dip the cookies in the espresso mixture for longer.  I was afraid of them becoming mushy!

And what an incredible challenge this was!  And not because I screwed anything up this time!  They made us make this from complete 100% scratch.  Right down to  making our own mascarpone cheese.  I had to read through the directions several times just to be sure they didn’t want us making our own vanilla and rum extracts!!!

I truly loved this challenge and for me it was probably one of the most rewarding.  If I had never done this challenge I would NEVER have made my own mascarpone cheese and it is something that is so delicious, simple and satisfying to do!  Thank you my dear, sweet friend Deeba and Aparna for this wonderful challenge!!!

P1020514 Mascarpone cheese, zabaglione, pastry cream, and Ladyfinger/Saviardi Biscuits

Due to time restrictions for me (we are leaving town today for a BMX Race) I only made a small one in a bread pan, but it was truly delicious…

The recipes for this challenge are presented in the following order:

A. Tiramisu (includes zabaglione & vanilla pastry cream)
B. Mascarpone Cheese
C. Ladyfinger/ Savoiardi Biscuits

MANDATORY:

You MUST make your own savoiardi / ladyfinger biscuits and mascarpone cheese with the given recipes. You must also make the zabaglione and pastry cream using the given recipes.
If diet or health restrictions do not allow you to use these recipes, please go ahead and use one of the alternatives provided or other suitable recipes to make them, but please include links to the original recipe in your DB post.
Sponge cake may be not be used as a substitute. After all, a large part of this challenge is making those biscuits.

VARIATIONS:

Tiramisu is usually made in square dishes and cut into squares to serve. If you want to be different, please feel free to give full rein to your creativity as to how you want to present, decorate and serve your tiramisu. Make it square, round, as individual servings, or whatever! However, your version of Tiramisu must contain the mascarpone cheese and the savoiardi/ ladyfinger biscuits you made.

PREPARATION TIME:

Tiramisu is made up of several components which can be made separately and ahead of time and put together the day before serving.
Making tiramisu from scratch requires about 2 to 3 days (including refrigeration) from when you start making the mascarpone to the time the tiramisu is served. So this challenge requires some prior planning.

Please read the instructions as you need to begin making the mascarpone at least a day in advance.
The zabaglione & pastry cream also need 4 hours to an overnight for chilling, as does the main dessert. The flavours mature after an overnight rest, and the dessert can be kept refrigerated for 2-3 days.
Once assembled, the tiramisu can be frozen till you need to serve it, in case you are not serving it immediately.

EQUIPMENT REQUIRED:

  • A double boiler (a stainless steel bowl that fits inside a large saucepan/ pot without touching the bottom will do)
  • Two or three large mixing bowls
  • Whisk
  • A medium sized heavy bottomed pan
  • Fine meshed strainer (to remove lumps from pastry cream, if any)
  • Electric mixer, hand held
  • Serving dish (or dishes) of choice (8" by 8" should be fine)
  • Spatula for folding and spoons as required
  • Plastic wrap/ clingfilm
  • Baking sheets
  • Parchment paper or nonstick liners
  • Pastry bag (can be disposable)
  • Plain 3/4" pastry bag tip or cut the end of pastry bag to this size (If you don’t have a pastry bag and/or tips, you can use a Ziploc bag with the corner snipped off)
  • Oven
  • Cooling rack
  • Thin-bladed spatula for removing ladyfinger biscuits from the baking sheets
  • Instant-read thermometer (optional)
  • Strainer
  • Cheesecloth or cotton napkin for draining mascarpone
  • Fine-mesh strainer for shaking cocoa powder on tiramisu

TIRAMISU

(Recipe source: Carminantonio's Tiramisu from The Washington Post, July 11 2007 )
This recipe makes 6 servings

Ingredients:
For the zabaglione:
2 large egg yolks
3 tablespoons sugar/50gms
1/4 cup/60ml Marsala wine (or port or coffee)
1/4 teaspoon/ 1.25ml vanilla extract
1/2 teaspoon finely grated lemon zest

For the vanilla pastry cream:
1/4 cup/55gms sugar
1 tablespoon/8gms all purpose flour
1/2 teaspoon finely grated lemon zest
1/2 teaspoon/ 2.5ml vanilla extract
1 large egg yolk
3/4 cup/175ml whole milk

For the whipped cream:
1 cup/235ml chilled heavy cream (we used 25%)
1/4 cup/55gms sugar
1/2 teaspoon/ 2.5ml vanilla extract

To assemble the tiramisu:
2 cups/470ml brewed espresso, warmed
1 teaspoon/5ml rum extract (optional)
1/2 cup/110gms sugar
1/3 cup/75gms mascarpone cheese
36 savoiardi/ ladyfinger biscuits (you may use less)
2 tablespoons/30gms unsweetened cocoa powder

Method:
For the zabaglione:
Heat water in a double boiler. If you don’t have a double boiler, place a pot with about an inch of water in it on the stove. Place a heat-proof bowl in the pot making sure the bottom does not touch the water.
In a large mixing bowl (or stainless steel mixing bowl), mix together the egg yolks, sugar, the Marsala (or espresso/ coffee), vanilla extract and lemon zest. Whisk together until the yolks are fully blended and the mixture looks smooth.
Transfer the mixture to the top of a double boiler or place your bowl over the pan/ pot with simmering water. Cook the egg mixture over low heat, stirring constantly, for about 8 minutes or until it resembles thick custard. It may bubble a bit as it reaches that consistency.
Let cool to room temperature and transfer the zabaglione to a bowl. Cover and refrigerate at least 4 hours or overnight, until thoroughly chilled.

For the pastry cream:
Mix together the sugar, flour, lemon zest and vanilla extract in a medium heavy-bottomed saucepan. To this add the egg yolk and half the milk. Whisk until smooth.
Now place the saucepan over low heat and cook, stirring constantly to prevent the mixture from curdling.
Add the remaining milk a little at a time, still stirring constantly. After about 12 minutes the mixture will be thick, free of lumps and beginning to bubble. (If you have a few lumps, don’t worry. You can push the cream through a fine-mesh strainer.)
Transfer the pastry cream to a bowl and cool to room temperature. Cover with plastic film and refrigerate at least 4 hours or overnight, until thoroughly chilled.

For the whipped cream:
Combine the cream, sugar and vanilla extract in a mixing bowl. Beat with an electric hand mixer or immersion blender until the mixture holds stiff peaks. Set aside.

To assemble the tiramisu:
Have ready a rectangular serving dish (about 8" by 8" should do) or one of your choice.
Mix together the warm espresso, rum extract and sugar in a shallow dish, whisking to mix well. Set aside to cool.
In a large bowl, beat the mascarpone cheese with a spoon to break down the lumps and make it smooth. This will make it easier to fold. Add the prepared and chilled zabaglione and pastry cream, blending until just combined. Gently fold in the whipped cream. Set this cream mixture aside.

Now to start assembling the tiramisu.
Workings quickly, dip 12 of the ladyfingers in the sweetened espresso, about 1 second per side. They should be moist but not soggy. Immediately transfer each ladyfinger to the platter, placing them side by side in a single row. You may break a lady finger into two, if necessary, to ensure the base of your dish is completely covered. (I should have soaked mine longer!!!)
Spoon one-third of the cream mixture on top of the ladyfingers, then use a rubber spatula or spreading knife to cover the top evenly, all the way to the edges.
Repeat to create 2 more layers, using 12 ladyfingers and the cream mixture for each layer. Clean any spilled cream mixture; cover carefully with plastic wrap and refrigerate the tiramisu overnight.
To serve, carefully remove the plastic wrap and sprinkle the tiramisu with cocoa powder using a fine-mesh strainer or decorate as you please. Cut into individual portions and serve.

MASCARPONE CHEESE

(Source: Vera’s Recipe for Homemade Mascarpone Cheese)
This recipe makes 12oz/ 340gm of mascarpone cheese

Ingredients:
474ml (approx. 500ml)/ 2 cups whipping (36 %) pasteurized (not ultra-pasteurized), preferably organic cream (between 25% to 36% cream will do)
1 tablespoon fresh lemon juice

Method:

Bring 1 inch of water to a boil in a wide skillet. Reduce the heat to medium-low so the water is barely simmering. Pour the cream into a medium heat-resistant bowl, then place the bowl into the skillet. Heat the cream, stirring often, to 190 F. If you do not have a thermometer, wait until small bubbles keep trying to push up to the surface.
It will take about 15 minutes of delicate heating. Add the lemon juice and continue heating the mixture, stirring gently, until the cream curdles. Do not expect the same action as you see during ricotta cheese making. All that the whipping cream will do is become thicker, like a well-done crème anglaise. It will cover a back of your wooden spoon thickly. You will see just a few clear whey streaks when you stir. Remove the bowl from the water and let cool for about 20 minutes. Meanwhile, line a sieve with four layers of dampened cheesecloth and set it over a bowl. Transfer the mixture into the lined sieve. Do not squeeze the cheese in the cheesecloth or press on its surface (be patient, it will firm up after refrigeration time). Once cooled completely, cover with plastic wrap and refrigerate (in the sieve) overnight or up to 24 hours.
Vera’s notes: The first time I made mascarpone I had all doubts if it’d been cooked enough, because of its custard-like texture. Have no fear, it will firm up beautifully in the fridge, and will yet remain lusciously creamy.
Keep refrigerated and use within 3 to 4 days.

LADYFINGERS/ SAVOIARDI BISCUITS
(Source: Recipe from Cordon Bleu At Home)
This recipe makes approximately 24 big ladyfingers or 45 small (2 1/2" to 3" long) ladyfingers.

Ingredients:
3 eggs, separated
6 tablespoons /75gms granulated sugar
3/4 cup/95gms cake flour, sifted (or 3/4 cup all purpose flour + 2 tbsp corn starch)
6 tablespoons /50gms confectioner's sugar,

Method:

Preheat your oven to 350 F (175 C) degrees, then lightly brush 2 baking sheets with oil or softened butter and line with parchment paper.
Beat the egg whites using a hand held electric mixer until stiff peaks form. Gradually add granulate sugar and continue beating until the egg whites become stiff again, glossy and smooth.
In a small bowl, beat the egg yolks lightly with a fork and fold them into the meringue, using a wooden spoon. Sift the flour over this mixture and fold gently until just mixed. It is important to fold very gently and not overdo the folding. Otherwise the batter would deflate and lose volume resulting in ladyfingers which are flat and not spongy.
Fit a pastry bag with a plain tip (or just snip the end off; you could also use a Ziploc bag) and fill with the batter. Pipe the batter into 5" long and 3/4" wide strips leaving about 1" space in between the strips.
Sprinkle half the confectioner's sugar over the ladyfingers and wait for 5 minutes. The sugar will pearl or look wet and glisten. Now sprinkle the remaining sugar. This helps to give the ladyfingers their characteristic crispness.
Hold the parchment paper in place with your thumb and lift one side of the baking sheet and gently tap it on the work surface to remove excess sprinkled sugar.
Bake the ladyfingers for 10 minutes, then rotate the sheets and bake for another 5 minutes or so until the puff up, turn lightly golden brown and are still soft.
Allow them to cool slightly on the sheets for about 5 minutes and then remove the ladyfingers from the baking sheet with a metal spatula while still hot, and cool on a rack.
Store them in an airtight container till required. They should keep for 2 to 3 weeks.

Thanks again Deeba and Aparna!

signature

Wednesday, January 27, 2010

The Daring Bakers do Nanaimo Bars

And lucky me…I grew up eating these!!!

The January 2010 Daring Bakers’ challenge was hosted by Lauren of Celiac Teen. Lauren chose Gluten-Free Graham Wafers and Nanaimo Bars as the challenge for the month. The sources she based her recipe on are 101 Cookbooks and www.nanaimo.ca.

I almost missed making these.  Something about them having to be posted on the 27th of the month just messes me up bad but with bold determination and severely lacking eyesight I forged ahead and got these done!!!

I knew I had to make the graham crackers first.  I had already decided that as interesting as it would be to do them gluten free I really didn’t have the time or the money to be hunting down ingredients I would only be using once so I cheated and made them with Whole Wheat Graham Flour and they really are delicious!!!  I made these this morning and it went off without a hitch.  Had them out of the oven and I was on my way to the eye doctor.  Well. by the time I got home I couldn’t see a thing.  He had tricked me a dilated my eyes.  I was virtually blind, but the DB Challenge must go on!!!  I cut the recipe and copied it and then made it REALLY, REALLY BIG so that I could at least make out the measures.  The whole time I am kicking myself for leaving it til the very last minute…:-(

Anyway…these turned out beautifully despite all of my self inflicted challenges and it brought back a lot of great childhood memories for me!!!

P1020442 These were taken after my eyes were dilated by the stupid eye doctor.  I was lucky to find the camera!!!

Graham Cracker Recipe (that I used) by Cupcake Project

Ingredients:

4 T (1/2 stick) butter, softened
1 egg
6 T sugar
4 T honey (Some graham crackers use half honey and half molasses. You might consider trying that as a variation.)
1/2 t baking soda
2 t water
3/4 t salt
1 1/2 C graham flour (If you can't get a hold of graham flour, there are plenty of graham cracker recipes that use regular whole wheat flour such as this graham cracker recipe from Baking Bites. You may also be able to directly substitute whole wheat flour in this recipe, but I haven't tested it and I make no promises.)
3/4 C all-purpose flour

Directions:

  1. Preheat the oven to 350 F.
  2. Combine the butter, egg and sugar in a bowl and beat until smooth and creamy.
  3. Stir in the honey and blend.
  4. Dissolve the baking soda in the water and add to the butter mixture.
  5. Add the salt, graham flour, and all-purpose flour to the mixture and blend thoroughly. The dough should hold together and be manageable. If it is too "tacky" add a little more graham flour.
  6. Liberally dust a surface with graham flour and roll the dough to a thickness of about 1/8 inch. For convenience in handling, cut the rolled dough into three or four sections that will fit on your cookie sheet. (I am not good at rolling things out. It doesn't come up too often since I mostly make cupcakes. To make my life easier, I lined my cookie sheets with parchment paper and rolled the dough directly on the cookie sheets. That way I didn't need to worry about the dough breaking when I lifted it onto a cookie sheet.)
  7. With a knife, score the dough, without cutting through, into 2 1/2 inch squares. (Boring! Since your graham crackers are not store-bought, they don't have to be square. Use your cookie cutters to make them any shape you want!)
  8. Prick each square a few times with the tines of a fork. (I did this because those little pricks do make them look like graham crackers, whatever shape they are.)
  9. Using a spatula, place the sections of scored cracker dough on an ungreased cookie sheet. (I didn't have to do this since I rolled right on the cookie sheet.)
  10. Bake on the first side for 8 minutes, then turn the cracker over and bake for another 6 or 7 minutes. (Cheryl of Free Range Living said that she found that flipping wasn't necessary. I agree. I left out the flip step.)
  11. Remove from the oven and cool on racks. (They weren't quite crispy when I removed them. However, they hardened up as soon as they cooled.)

Here how is the recipe as it should have been done for gluten free:

For Gluten-Free Graham Wafers
Ingredients
1 cup (138 g) (4.9 ounces) Sweet rice flour (also known as glutinous rice flour)
3/4 cup (100 g) (3.5 ounces) Tapioca Starch/Flour
1/2 cup (65 g) (2.3 ounces) Sorghum Flour
1 cup (200 g) (7.1 ounces) Dark Brown Sugar, Lightly packed
1 teaspoon (5 mL) Baking soda
3/4 teaspoon (4 mL ) Kosher Salt
7 tablespoons (100 g) (3 ½ ounces) Unsalted Butter (Cut into 1-inch cubes and frozen)
1/3 cup (80 mL) Honey, Mild-flavoured such as clover.
5 tablespoons (75 mL) Whole Milk
2 tablespoons (30 mL) Pure Vanilla Extract

Directions:
1. In the bowl of a food processor fitted with a steel blade, combine the flours, brown sugar, baking soda, and salt. Pulse on low to incorporate. Add the butter and pulse on and off, until the mixture is the consistency of a coarse meal. If making by hand, combine aforementioned dry ingredients with a whisk, then cut in butter until you have a coarse meal. No chunks of butter should be visible.
2. In a small bowl or liquid measuring cup, whisk together the honey, milk and vanilla. Add to the flour mixture until the dough barely comes together. It will be very soft and sticky.
3. Turn the dough onto a surface well-floured with sweet rice flour and pat the dough into a rectangle about 1 inch thick. Wrap in plastic and chill until firm, about 2 hours, or overnight.
4. Divide the dough in half and return one half to the refrigerator. Sift an even layer of sweet rice flour onto the work surface and roll the dough into a long rectangle, about 1/8 inch thick. The dough will be quite sticky, so flour as necessary. Cut into 4 by 4 inch squares. Gather the scraps together and set aside. Place wafers on one or two parchment-lined baking sheets. Chill until firm, about 30 to 45 minutes. Repeat with the second batch of dough.
5. Adjust the rack to the upper and lower positions and preheat oven to 350 degrees Fahrenheit (180 degrees Celsius).
6. Gather the scraps together into a ball, chill until firm, and reroll. Dust the surface with more sweet rice flour and roll out the dough to get a couple more wafers.
7. Prick the wafers with toothpick or fork, not all the way through, in two or more rows.
8. Bake for 25 minutes, until browned and slightly firm to the touch, rotating sheets halfway through to ensure even baking. Might take less, and the starting location of each sheet may determine its required time. The ones that started on the bottom browned faster.
9. When cooled completely, place enough wafers in food processor to make 1 ¼ cups (300 mL) of crumbs. Another way to do this is to place in a large ziplock bag, force all air out and smash with a rolling pin until wafers are crumbs.

P1020445

Nanaimo Bars

Ingredients:

For Nanaimo Bars — Bottom Layer
1/2 cup (115 g) (4 ounces) Unsalted Butter
1/4 cup (50 g) (1.8 ounces) Granulated Sugar
5 tablespoons (75 mL) Unsweetened Cocoa
1 Large Egg, Beaten
1 1/4 cups (300 mL) (160 g) (5.6 ounces) Gluten Free Graham Wafer Crumbs (See previous recipe)
1/2 cup (55 g) (1.9 ounces) Almonds (Any type, Finely chopped)
1 cup (130 g) (4.5 ounces) Coconut (Shredded, sweetened or unsweetened)

For Nanaimo Bars — Middle Layer
1/2 cup (115 g) (4 ounces) Unsalted Butter
2 tablespoons and 2 teaspoons (40 mL) Heavy Cream
2 tablespoons (30 mL) Vanilla Custard Powder (Such as Bird’s. Vanilla pudding mix may be substituted.)
2 cups (254 g) (8.9 ounces) Icing Sugar

For Nanaimo Bars — Top Layer
4 ounces (115 g) Semi-sweet chocolate
2 tablespoons (28 g) (1 ounce) Unsalted Butter

Directions:

1. For bottom Layer: Melt unsalted butter, sugar and cocoa in top of a double boiler. Add egg and stir to cook and thicken. Remove from heat. Stir in crumbs, nuts and coconut. Press firmly into an ungreased 8 by 8 inch pan.
2. For Middle Layer: Cream butter, cream, custard powder, and icing sugar together well. Beat until light in colour. Spread over bottom layer.
3. For Top Layer: Melt chocolate and unsalted butter over low heat. Cool. Once cool, pour over middle layer and chill.

Okay, I really loved these and despite all of my self inflicted trouble with them I would make them again and again!  Almost every family special occasion that we had we had the on the dessert table.  Such a treat to be able to make these myself.  Thanks Lauren for the opportunity and the reminder!

signature

Friday, November 27, 2009

Daring Baker Challenge: Cannoli!!!

The November 2009 Daring Bakers Challenge was chosen and hosted by Lisa Michele of Parsley, Sage, Desserts and Line Drives. She chose the Italian Pastry, Cannolo (Cannoli is plural), using the cookbooks Lidia’s Italian-American Kitchen by Lidia Matticchio Bastianich and The Sopranos Family Cookbook by Allen Rucker; recipes by Michelle Scicolone, as ingredient/direction guides. She added her own modifications/changes, so the recipe is not 100% verbatim from either book.
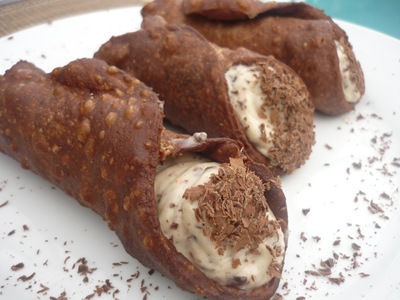
P1020146

I was so excited about this challenge!  I even did it the weekend before it was due and anyone that knows me knows that this is unheard of.  I absolutely loved these.  I made a few mistakes and changes along the way…I thought the recipe said 1 cup of cocoa???!!! and it only called for 1 tsp, (I ended up adding about 2 Tbsp) hence the darkness of my dough and then I made up the filling as I went along and it turned out perfect!

Below is the recipe as written but for my filling I used 1 lb of mascarpone cheese, 1 cup sifted confectioners sugar (to taste), 1 tsp vanilla extract and lots of grated Dark semi-sweet Callebaut chocolate!

Don’t be afraid of these!  This was an incredible recipe and experience.  Oh I also used a one inch dowel cut into 8 inch pieces for my forms…easy as can be!

Equipment:
Cannoli forms/tubes - optional, but recommended if making traditional shaped cannoli. Dried cannelloni pasta tubes work just as well!
Deep, heavy saucepan, enough to hold at least 2-3-inches of oil or deep fryer
Deep fat frying thermometer. although the bread cube or bit of dough test will work fine.
Metal tongs
Brass or wire skimmer OR large slotted spoon
Pastry bag with large star or plain tip, but a snipped ziplock bag, butter knife or teaspoon will work fine.
Cooling rack
Paper bags or paper towels
Pastry Brush
Cheesecloth
Sieve or fine wire mesh strainer
Electric Mixer, stand or hand, optional, as mixing the filling with a spoon is fine.
Food Processor or Stand Mixer – also optional, since you can make the dough by hand, although it takes more time.
Rolling pin and/or Pasta roller/machine
Pastry or cutting board
Round cutters - The dough can also be cut into squares and rolled around the cannoli tube prior to frying. If making a stacked cannoli, any shaped cutter is fine, as well as a sharp knife.
Mixing bowl and wooden spoon if mixing filling by hand
Plastic Wrap/Clingfilm
Tea towels or just cloth towels

Required: Must make cannoli dough and shells. If you don’t have or do not want to purchase cannoli forms, which I would never ask of any of you, you could simply cut out circles, squares, or any shapes you want and stack them with the filling of your choice to make stacked cannoli's aka Cannolipoleons (directions below). If desired, you can channel MacGuyver and fashion something heat proof to get traditional shaped cannoli (6-8 inch sawed off lengths of a wooden broom stick or cane, sanded down and oiled, is THE authentic cannoli form!), or non-traditional shapes such as creating a form to make bowls, or even using cream horns if you happen to have them. Mini cannoli would be great too, and I've provided links to retailers of cannoli forms of all sizes.

Also, for those who don't like to cook or bake with alcohol - grape juice, cranberry juice, pomegranate juice, apple juice..any sweet juice of a fruit, especially ones used in or to make wine, can be substituted. Just add a little more vinegar to insure you get enough acid to relax the dough

Variations: The filling is YOUR choice! Anything you want to fill them with is perfectly fine, sweet or savory, or you can use the filling recipe provided – making whatever changes you want to it. Cannoli would make a great addition to a Thanksgiving dessert table/spread. In many Italian households, during the holidays, cannoli is always part of the dessert offerings. You could also make a Thanksgiving themed cannoli, like pumpkin cannoli (I came up with a great pumpkin filling recipe below) or apples, pecans, walnuts, any dried fruits etc. An idea to gussy up your cannoli is; dipping the rims of the shell in melted chocolate and rolling in chopped nuts or sprinkles, then letting them set prior to filling. Dipping or pressing mini chocolate chips into the filled ends OR just stirring mini chocolate chips into the filling prior to stacking or filling whatever shaped shells you come up with, is another great idea and makes a nice presentation The sky is the limit here, be creative! Naturally, if you have any dietary restrictions, by all means, go with it. I’ve provided a link to a gluten-free cannoli recipe and a slightly savory vegan cannoli recipe to help get you started.

Bonus option: Make your own ricotta and/or mascarpone cheese! http://lisamichele.wordpress.com/2009/05/04/eating-my-curds-and-ditching...
http://www.bakingobsession.com/2009/05/02/homemade-mascarpone-cheese/

Technically, I know, this is not baking, and if you prefer to steer clear of the deep fry, you can bake the shell. You won’t get the snappy, blistery texture and appearance that make cannoli so special, but I’m sure it’ll taste good nonetheless. Here’s a link where the cook bakes some of his cannoli shells: http://www.ifood.tv/network/cannoli/recipes

Lidisano’s Cannoli
Makes 22-24 4-inch cannoli
Prep time:
Dough – 2 hours and 10-20 minutes, including resting time, and depending on whether you do it by hand or machine.
Filling – 5-10 minutes plus chilling time (about 2 hours or more)
Frying – 1-2 minutes per cannoli
Assemble – 20–30 minutes

RECIPE NOTE: THE EQUIVALENTS FROM THIS RECIPE WERE PREPARED USING THIS CONVERSION SITE: http://www.gourmetsleuth.com/index.asp.

CANNOLI SHELLS
2 cups (250 grams/16 ounces) all-purpose flour
2 tablespoons(28 grams/1 ounce) sugar
1 teaspoon (5 grams/0.06 ounces) unsweetened baking cocoa powder
1/2 teaspoon (1.15 grams/0.04 ounces) ground cinnamon
1/2 teaspoon (approx. 3 grams/0.11 ounces) salt
3 tablespoons (42 grams/1.5 ounces) vegetable or olive oil
1 teaspoon (5 grams/0.18 ounces) white wine vinegar
Approximately 1/2 cup (approx. 59 grams/approx. 4 fluid ounces/approx. 125 ml) sweet Marsala or any white or red wine you have on hand
1 large egg, separated (you will need the egg white but not the yolk)
Vegetable or any neutral oil for frying – about 2 quarts (8 cups/approx. 2 litres)
1/2 cup (approx. 62 grams/2 ounces) toasted, chopped pistachio nuts, mini chocolate chips/grated chocolate and/or candied or plain zests, fruits etc.. for garnish
Confectioners' sugar

Note - If you want a chocolate cannoli dough, substitute a few tablespoons of the flour (about 25%) with a few tablespoons of dark, unsweetened cocoa powder (Dutch process) and a little more wine until you have a workable dough (Thanks to Audax).

CANNOLI FILLING
2 lbs (approx. 3.5 cups/approx. 1 kg/32 ounces) ricotta cheese, drained
1 2/3 cups cup (160 grams/6 ounces) confectioner’s sugar, (more or less, depending on how sweet you want it), sifted
1/2 teaspoon (1.15 grams/0.04 ounces) ground cinnamon
1 teaspoon (4 grams/0.15 ounces) pure vanilla extract or the beans from one vanilla bean
3 tablespoons (approx. 28 grams/approx. 1 ounce) finely chopped good quality chocolate of your choice
2 tablespoons (12 grams/0.42 ounces) of finely chopped, candied orange peel, or the grated zest of one small to medium orange
3 tablespoons (23 grams/0.81 ounce) toasted, finely chopped pistachios

Note - If you want chocolate ricotta filling, add a few tablespoons of dark, unsweetened cocoa powder to the above recipe, and thin it out with a few drops of warm water if too thick to pipe.

DIRECTIONS FOR SHELLS:
1. In the bowl of an electric stand mixer or food processor, combine the flour, sugar, cocoa, cinnamon, and salt. Stir in the oil, vinegar, and enough of the wine to make a soft dough. Turn the dough out onto a lightly floured surface and knead until smooth and well blended, about 2 minutes. Shape the dough into a ball. Cover with plastic wrap and let rest in the fridge from 2 hours to overnight.

2 Cut the dough into two pieces. Keep the remaining dough covered while you work. Lightly flour a large cutting or pastry board and roll the dough until super thin, about 1/16 to 1/8” thick (An area of about 13 inches by 18 inches should give you that). Cut out 3 to 5-inch circles (3-inch – small/medium; 4-inch – medium/large; 5-inch;- large. Your choice). Roll the cut out circle into an oval, rolling it larger and thinner if it’s shrunk a little.

3 Oil the outside of the cannoli tubes (You only have to do this once, as the oil from the deep fry will keep them well, uhh, oiled..lol). Roll a dough oval from the long side (If square, position like a diamond, and place tube/form on the corner closest to you, then roll) around each tube/form and dab a little egg white on the dough where the edges overlap. (Avoid getting egg white on the tube, or the pastry will stick to it.) Press well to seal. Set aside to let the egg white seal dry a little.

4. In a deep heavy saucepan, pour enough oil to reach a depth of 3 inches, or if using an electric deep-fryer, follow the manufacturer's directions. Heat the oil to 375°F (190 °C) on a deep fry thermometer, or until a small piece of the dough or bread cube placed in the oil sizzles and browns in 1 minute. Have ready a tray or sheet pan lined with paper towels or paper bags.

5. Carefully lower a few of the cannoli tubes into the hot oil. Do not crowd the pan. Fry the shells until golden, about 2 minutes, turning them so that they brown evenly.

8. Lift a cannoli tube with a wire skimmer or large slotted spoon, out of the oil. Using tongs, grasp the cannoli tube at one end. Very carefully remove the cannoli tube with the open sides straight up and down so that the oil flows back into the pan. Place the tube on paper towels or bags to drain. Repeat with the remaining tubes. While they are still hot, grasp the tubes with a potholder and pull the cannoli shells off the tubes with a pair of tongs, or with your hand protected by an oven mitt or towel. Let the shells cool completely on the paper towels. Place shells on cooling rack until ready to fill.

9. Repeat making and frying the shells with the remaining dough. If you are reusing the cannoli tubes, let them cool before wrapping them in the dough.

Pasta Machine method:
1. Divide the dough into 4 equal pieces. Starting at the middle setting, run one of the pieces of dough through the rollers of a pasta machine. Lightly dust the dough with flour as needed to keep it from sticking. Pass the dough through the machine repeatedly, until you reach the highest or second highest setting. The dough should be about 4 inches wide and thin enough to see your hand through

2. Continue rolling out the remaining dough. If you do not have enough cannoli tubes for all of the dough, lay the pieces of dough on sheets of plastic wrap and keep them covered until you are ready to use them.

3, Roll, cut out and fry the cannoli shells as according to the directions above.

For stacked cannoli:
1. Heat 2-inches of oil in a saucepan or deep sauté pan, to 350-375°F (176 - 190 °C).

2. Cut out desired shapes with cutters or a sharp knife. Deep fry until golden brown and blistered on each side, about 1 – 2 minutes. Remove from oil with wire skimmer or large slotted spoon, then place on paper towels or bags until dry and grease free. If they balloon up in the hot oil, dock them lightly prior to frying. Place on cooling rack until ready to stack with filling.

DIRECTIONS FOR FILLING:
1. Line a strainer with cheesecloth. Place the ricotta in the strainer over a bowl, and cover with plastic wrap and a towel. Weight it down with a heavy can, and let the ricotta drain in the refrigerator for several hours to overnight.

2. In a bowl with electric mixer, beat ricotta until smooth and creamy. Beat in confectioner’s sugar, cinnamon, vanilla and blend until smooth. Transfer to another bowl and stir in chocolate, zest and nuts. Chill until firm.(The filling can be made up to 24 hours prior to filling the shells. Just cover and keep refrigerated).

ASSEMBLE THE CANNOLI:
1. When ready to serve..fill a pastry bag fitted with a 1/2-inch plain or star tip, or a ziplock bag, with the ricotta cream. If using a ziplock bag, cut about 1/2 inch off one corner. Insert the tip in the cannoli shell and squeeze gently until the shell is half filled. Turn the shell and fill the other side. You can also use a teaspoon to do this, although it’s messier and will take longer.

2. Press or dip cannoli in chopped pistachios, grated chocolate/mini chocolate chips, candied fruit or zest into the cream at each end. Dust with confectioner’s sugar and/or drizzles of melted chocolate if desired.

TIPS AND NOTES:
- Dough must be stiff and well kneaded

- Rolling the dough to paper thinness, using either a rolling pin or pasta machine, is very important. If the dough is not rolled thin enough, it will not blister, and good cannoli should have a blistered surface.

- Initially, this dough is VERY stubborn, but keep rolling, it eventually gives in. Before cutting the shapes, let the dough rest a bit, covered, as it tends to spring back into a smaller shapes once cut. Then again, you can also roll circles larger after they’re cut, and/or into ovals, which gives you more space for filling.

- Your basic set of round cutters usually doesn’t contain a 5-inch cutter. Try a plastic container top, bowl etc, or just roll each circle to 5 inches. There will always be something in your kitchen that’s round and 5-inches if you want large cannoli.

- Oil should be at least 3 inches deep and hot – 360°F-375°F, or you’ll end up with greasy shells. I prefer 350°F - 360°F because I felt the shells darkened too quickly at 375°F.

- If using the cannoli forms, when you drop the dough on the form into the oil, they tend to sink to the bottom, resulting in one side darkening more. Use a slotted spoon or skimmer to gently lift and roll them while frying.

- DO NOT crowd the pan. Cannoli should be fried 2-4 at a time, depending on the width of your saucepan or deep fryer. Turn them once, and lift them out gently with a slotted spoon/wire skimmer and tongs. Just use a wire strainer or slotted spoon for flat cannoli shapes.

- When the cannoli turns light brown - uniform in color, watch it closely or remove it. If it’s already a deep brown when you remove it, you might end up with a really dark or slightly burnt shell.

- Depending on how much scrap you have left after cutting out all of your cannoli shapes, you can either fry them up and sprinkle with confectioner’s sugar for a crispy treat, or let the scraps rest under plastic wrap and a towel, then re-roll and cut more cannoli shapes.

- Push forms out of cannoli very gently, being careful not to break the shells as they are very delicate. DO NOT let the cannoli cool on the form, or you may never get it off without it breaking. Try to take it off while still hot. Hold it with a cloth in the center, and push the form out with a butter knife or the back of a spoon.

- When adding the confectioner’s sugar to the filling..TASTE. You may like it sweeter than what the recipe calls for, or less sweet, so add in increments.

- Fill cannoli right before serving! If you fill them an hour or so prior, you’ll end up with soggy cannoli shells.

- If you want to prepare the shells ahead of time, store them in an airtight container, then re-crisp in a 350°F (176 °C) oven for a few minutes, before filling.

- Practice makes perfect. My first batch of shells came out less than spectacular, and that’s an understatement. As you go along, you’ll see what will make them more aesthetically pleasing, and adjust accordingly when rolling. My next several batches turned out great. Don’t give up!!

Sunday, September 27, 2009

Daring Baker’s do Puff Pastry and Vols-au-Vents

The September 2009 Daring Bakers' challenge was hosted by Steph of A Whisk and a Spoon. She chose the French treat, Vols-au-Vent based on the Puff Pastry recipe by Michel Richard from the cookbook Baking With Julia by Dorie Greenspan.

P1010892 Wow, was this month’s challenge ever a “challenge” . Our temps here in Southwest Florida are still in the mid 90’s every single day and if I turn my A/C to more than 80F I end up with an electric bill that is $350+!!! Anyone who has ever worked with puff pastry knows that these are not ideal circumstances for making the dough…But I DID IT!!!! And look how pretty and puffy these turned out!!!

There was a lot of refrigerating going on though and I had butter popping through and melting all over my counter so I was shocked at how nicely these turned out. Unfortunately they took me a whole day to make and then I let them chill over night. After all of that I just ran out of time for making the wonderful lemon mousse that I had planned to fill them with. Whatever, the girls loved them filled with fresh blueberries and drizzled with chocolate. Isn’t that what it’s all about anyway???

P1010891

For this challenge we had to make puff pastry (Michel Richard’s recipe) and form at least part of it into vols-au-vent…

The recipe and directions:

Equipment:
-food processor (will make mixing dough easy, but I imagine this can be done by hand as well)
-rolling pin
-pastry brush
-metal bench scraper (optional, but recommended)
-plastic wrap
-baking sheet
-parchment paper
-silicone baking mat (optional, but recommended)
-set of round cutters (optional, but recommended)
-sharp chef’s knife
-fork
-oven
-cooling rack

Prep Times:
-about 4-5 hours to prepare the puff pastry dough (much of this time is inactive, while you wait for the dough to chill between turns…it can be stretched out over an even longer period of time if that better suits your schedule)
-about 1.5 hours to shape, chill and bake the vols-au-vent after your puff pastry dough is complete

Refrigerate the assembled vols-au-vent on the lined baking sheet while you pre-heat the oven to 400ºF (200ºC). (You could also cover and refrigerate them for a few hours at this point.)

Once the oven is heated, remove the sheet from the refrigerator and place a silicon baking mat (preferred because of its weight) or another sheet of parchment over top of the shells. This will help them rise evenly. Bake the shells until they have risen and begin to brown, about 10-15 minutes depending on their size. Reduce the oven temperature to 350ºF (180ºC), and remove the silicon mat or parchment sheet from the top of the vols-au-vent. If the centers have risen up inside the vols-au-vent, you can gently press them down. Continue baking (with no sheet on top) until the layers are golden, about 15-20 minutes more. (If you are baking the center “caps” they will likely be finished well ahead of the shells, so keep an eye on them and remove them from the oven when browned.)

Remove to a rack to cool. Cool to room temperature for cold fillings or to warm for hot fillings.

Fill and serve.

*For additional rise on the larger-sized vols-au-vents, you can stack one or two additional ring layers on top of each other (using egg wash to "glue"). This will give higher sides to larger vols-au-vents, but is not advisable for the smaller ones, whose bases may not be large enough to support the extra weight.

*Although they are at their best filled and eaten soon after baking, baked vols-au-vent shells can be stored airtight for a day.

*Shaped, unbaked vols-au-vent can be wrapped and frozen for up to a month (bake from frozen, egg-washing them first).

Michel Richard’s Puff Pastry Dough

From: Baking with Julia by Dorie Greenspan
Yield: 2-1/2 pounds dough

Steph’s note: This recipe makes more than you will need for the quantity of vols-au-vent stated above. While I encourage you to make the full recipe of puff pastry, as extra dough freezes well, you can halve it successfully if you’d rather not have much leftover.

There is a wonderful on-line video from the PBS show “Baking with Julia” that accompanies the book. In it, Michel Richard and Julia Child demonstrate making puff pastry dough (although they go on to use it in other applications). They do seem to give slightly different ingredient measurements verbally than the ones in the book…I listed the recipe as it appears printed in the book. http://video.pbs.org/video/1174110297/search/Pastry

Ingredients:
2-1/2 cups (12.2 oz/ 354 g) unbleached all-purpose flour
1-1/4 cups (5.0 oz/ 142 g) cake flour
1 tbsp. salt (you can cut this by half for a less salty dough or for sweet preparations)
1-1/4 cups (10 fl oz/ 300 ml) ice water
1 pound (16 oz/ 454 g) very cold unsalted butter

plus extra flour for dusting work surface

Mixing the Dough:

Check the capacity of your food processor before you start. If it cannot hold the full quantity of ingredients, make the dough into two batches and combine them.

Put the all-purpose flour, cake flour, and salt in the work bowl of a food processor fitted with a metal blade and pulse a couple of times just to mix. Add the water all at once, pulsing until the dough forms a ball on the blade. The dough will be very moist and pliable and will hold together when squeezed between your fingers. (Actually, it will feel like Play-Doh.)

Remove the dough from the machine, form it into a ball, with a small sharp knife, slash the top in a tic-tac-toe pattern. Wrap the dough in a damp towel and refrigerate for about 5 minutes.

Meanwhile, place the butter between 2 sheets of plastic wrap and beat it with a rolling pin until it flattens into a square that's about 1" thick. Take care that the butter remains cool and firm: if it has softened or become oily, chill it before continuing.

Incorporating the Butter:

Unwrap the dough and place it on a work surface dusted with all-purpose flour (A cool piece of marble is the ideal surface for puff pastry) with your rolling pin (preferably a French rolling pin without handles), press on the dough to flatten it and then roll it into a 10" square. Keep the top and bottom of the dough well floured to prevent sticking and lift the dough and move it around frequently. Starting from the center of the square, roll out over each corner to create a thick center pad with "ears," or flaps.

Place the cold butter in the middle of the dough and fold the ears over the butter, stretching them as needed so that they overlap slightly and encase the butter completely. (If you have to stretch the dough, stretch it from all over; don't just pull the ends) you should now have a package that is 8" square.

To make great puff pastry, it is important to keep the dough cold at all times. There are specified times for chilling the dough, but if your room is warm, or you work slowly, or you find that for no particular reason the butter starts to ooze out of the pastry, cover the dough with plastic wrap and refrigerate it . You can stop at any point in the process and continue at your convenience or when the dough is properly chilled.

Making the Turns:

Gently but firmly press the rolling pin against the top and bottom edges of the square (this will help keep it square). Then, keeping the work surface and the top of the dough well floured to prevent sticking, roll the dough into a rectangle that is three times as long as the square you started with, about 24" (don't worry about the width of the rectangle: if you get the 24", everything else will work itself out.) With this first roll, it is particularly important that the butter be rolled evenly along the length and width of the rectangle; check when you start rolling that the butter is moving along well, and roll a bit harder or more evenly, if necessary, to get a smooth, even dough-butter sandwich (use your arm-strength!).

With a pastry brush, brush off the excess flour from the top of the dough, and fold the rectangle up from the bottom and down from the top in thirds, like a business letter, brushing off the excess flour. You have completed one turn.

Rotate the dough so that the closed fold is to your left, like the spine of a book. Repeat the rolling and folding process, rolling the dough to a length of 24" and then folding it in thirds. This is the second turn.

Chilling the Dough:

If the dough is still cool and no butter is oozing out, you can give the dough another two turns now. If the condition of the dough is iffy, wrap it in plastic wrap and refrigerate it for at least 30 minutes. Each time you refrigerate the dough, mark the number of turns you've completed by indenting the dough with your fingertips. It is best to refrigerate the dough for 30 to 60 minutes between each set of two turns.

The total number of turns needed is six. If you prefer, you can give the dough just four turns now, chill it overnight, and do the last two turns the next day. Puff pastry is extremely flexible in this regard. However, no matter how you arrange your schedule, you should plan to chill the dough for at least an hour before cutting or shaping it.

Steph’s extra tips:

-While this is not included in the original recipe we are using (and I did not do this in my own trials), many puff pastry recipes use a teaspoon or two of white vinegar or lemon juice, added to the ice water, in the détrempe dough. This adds acidity, which relaxes the gluten in the dough by breaking down the proteins, making rolling easier. You are welcome to try this if you wish.

-Keep things cool by using the refrigerator as your friend! If you see any butter starting to leak through the dough during the turning process, rub a little flour on the exposed dough and chill straight away. Although you should certainly chill the dough for 30 to 60 minutes between each set of two turns, if you feel the dough getting to soft or hard to work with at any point, pop in the fridge for a rest.

-Not to sound contradictory, but if you chill your paton longer than the recommended time between turns, the butter can firm up too much. If this seems to be the case, I advise letting it sit at room temperature for 5-10 minutes to give it a chance to soften before proceeding to roll. You don't want the hard butter to separate into chuncks or break through the dough...you want it to roll evenly, in a continuous layer.

-Roll the puff pastry gently but firmly, and don’t roll your pin over the edges, which will prevent them from rising properly. Don't roll your puff thinner than about about 1/8 to 1/4-inch (3-6 mm) thick, or you will not get the rise you are looking for.

-Try to keep “neat” edges and corners during the rolling and turning process, so the layers are properly aligned. Give the edges of the paton a scooch with your rolling pin or a bench scraper to keep straight edges and 90-degree corners.

-Brush off excess flour before turning dough and after rolling.

-Make clean cuts. Don’t drag your knife through the puff or twist your cutters too much, which can inhibit rise.

-When egg washing puff pastry, try not to let extra egg wash drip down the cut edges, which can also inhibit rise.

-Extra puff pastry dough freezes beautifully. It’s best to roll it into a sheet about 1/8 to 1/4-inch thick (similar to store-bought puff) and freeze firm on a lined baking sheet. Then you can easily wrap the sheet in plastic, then foil (and if you have a sealable plastic bag big enough, place the wrapped dough inside) and return to the freezer for up to a few months. Defrost in the refrigerator when ready to use.

-You can also freeze well-wrapped, unbaked cut and shaped puff pastry (i.e., unbaked vols-au-vent shells). Bake from frozen, without thawing first.

-Homemade puff pastry is precious stuff, so save any clean scraps. Stack or overlap them, rather than balling them up, to help keep the integrity of the layers. Then give them a singe “turn” and gently re-roll. Scrap puff can be used for applications where a super-high rise is not necessary (such as palmiers, cheese straws, napoleons, or even the bottom bases for your vols-au-vent).

Forming and Baking the Vols-au-Vent

Yield: 1/3 of the puff pastry recipe below will yield about 8-10 1.5” vols-au-vent or 4 4” vols-au-vent

In addition to the equipment listed above, you will need:
-well-chilled puff pastry dough (recipe below)
-egg wash (1 egg or yolk beaten with a small amount of water)
-your filling of choice

Line a baking sheet with parchment and set aside.

Using a knife or metal bench scraper, divided your chilled puff pastry dough into three equal pieces. Work with one piece of the dough, and leave the rest wrapped and chilled. (If you are looking to make more vols-au-vent than the yield stated above, you can roll and cut the remaining two pieces of dough as well…if not, then leave refrigerated for the time being or prepare it for longer-term freezer storage. See the “Tips” section below for more storage info.)

On a lightly floured surface, roll the piece of dough into a rectangle about 1/8 to 1/4-inch (3-6 mm) thick. Transfer it to the baking sheet and refrigerate for about 10 minutes before proceeding with the cutting.

(This assumes you will be using round cutters, but if you do not have them, it is possible to cut square vols-au-vents using a sharp chef’s knife.) For smaller, hors d'oeuvre sized vols-au-vent, use a 1.5” round cutter to cut out 8-10 circles. For larger sized vols-au-vent, fit for a main course or dessert, use a 4” cutter to cut out about 4 circles. Make clean, sharp cuts and try not to twist your cutters back and forth or drag your knife through the dough. Half of these rounds will be for the bases, and the other half will be for the sides. (Save any scrap by stacking—not wadding up—the pieces…they can be re-rolled and used if you need extra dough. If you do need to re-roll scrap to get enough disks, be sure to use any rounds cut from it for the bases, not the ring-shaped sides.)

Using a ¾-inch cutter for small vols-au-vent, or a 2- to 2.5-inch round cutter for large, cut centers from half of the rounds to make rings. These rings will become the sides of the vols-au-vent, while the solid disks will be the bottoms. You can either save the center cut-outs to bake off as little “caps” for you vols-au-vent, or put them in the scrap pile.

Dock the solid bottom rounds with a fork (prick them lightly, making sure not to go all the way through the pastry) and lightly brush them with egg wash. Place the rings directly on top of the bottom rounds and very lightly press them to adhere. Brush the top rings lightly with egg wash, trying not to drip any down the sides (which may inhibit rise). If you are using the little “caps,” dock and egg wash them as well.

As Always…

Happy Entertaining!!!

Judy
www.nofearentertaining.com

Monday, July 27, 2009

The Daring Baker Challenge…I made Mallows!!!

I did it!  Once again I managed to pull it off in the 11th hour.  I am in good company though as I am sure that my buddy @kellypea of Sass & Veracity is doing the same.  My other good buddy @vindee of Passionate About Baking has been spurring me on all month to no avail so she will be pleased to see them finally finished!!!

The July Daring Bakers' challenge was hosted by Nicole at Sweet Tooth. She chose Chocolate Covered Marshmallow Cookies and Milan Cookies from pastry chef Gale Gand of the Food Network.

P1010764

This was such a perfect challenge for the crazy summer months!  Thanks so much Nicole for not weighing us down with some insurmountable task when we are all so busy trying to have some fun!!!  I have also started working a new part-time job and with the training schedule and just trying to figure out what I am doing everything is a but more hectic…

For this months challenge we were allowed to choose between the two cookies or to make them both.  I choose to make the Mallows and skip the Milan Cookies mainly because I ran out of chocolate and also that we did not need that many cookies in the house!!!  I did take the easy way out and used store bought marshmallows and I am a little disappointed in myself but I promised myself and the girls that I will try to make marshmallows at some later date when life isn't quite so complicated!

P1010767

Mallows(Chocolate Covered Marshmallow Cookies) Recipe courtesy Gale Gand, from Food Network website

Prep Time: 10 min
Inactive Prep Time: 5 min
Cook Time: 10 min
Serves: about 2 dozen cookies

• 3 cups (375grams/13.23oz) all purpose flour
• 1/2 cup (112.5grams/3.97oz) white sugar
• 1/2 teaspoon salt
• 3/4 teaspoon baking powder
• 3/8 teaspoon baking soda
• 1/2 teaspoon ground cinnamon
• 12 tablespoons (170grams/ 6 oz) unsalted butter
• 3 eggs, whisked together
• Homemade marshmallows, recipe follows
• Chocolate glaze, recipe follows

1. In a mixer with the paddle attachment, blend the dry ingredients.
2. On low speed, add the butter and mix until sandy.
3. Add the eggs and mix until combine.
4. Form the dough into a disk, wrap with clingfilm or parchment and refrigerate at least 1 hour and up to 3 days.
5. When ready to bake, grease a cookie sheet or line it with parchment paper or a silicon mat.
6. Preheat the oven to 375 degrees F.
7. Roll out the dough to 1/8-inch thickness, on a lightly floured surface. Use a 1 to 1 1/2 inches cookie cutter to cut out small rounds of dough.
8. Transfer to the prepared pan and bake for 10 minutes or until light golden brown. Let cool to room temperature.
9. Pipe a “kiss” of marshmallow onto each cookie. Let set at room temperature for 2 hours.
10. Line a cookie sheet with parchment or silicon mat.
11. One at a time, gently drop the marshmallow-topped cookies into the hot chocolate glaze.
12. Lift out with a fork and let excess chocolate drip back into the bowl.
13. Place on the prepared pan and let set at room temperature until the coating is firm, about 1 to 2 hours.

Note: if you don’t want to make your own marshmallows, you can cut a large marshmallow in half and place on the cookie base. Heat in a preheated 350-degree oven to slump the marshmallow slightly, it will expand and brown a little. Let cool, then proceed with the chocolate dipping.

Homemade marshmallows:
• 1/4 cup water
• 1/4 cup light corn syrup
• 3/4 cup (168.76 grams/5.95oz) sugar
• 1 tablespoon powdered gelatin
• 2 tablespoons cold water
• 2 egg whites , room temperature
• 1/4 teaspoon pure vanilla extract

1. In a saucepan, combine the water, corn syrup, and sugar, bring to a boil until “soft-ball” stage, or 235 degrees on a candy thermometer.
2. Sprinkle the gelatin over the cold water and let dissolve.
3. Remove the syrup from the heat, add the gelatin, and mix.
4. Whip the whites until soft peaks form and pour the syrup into the whites.
5. Add the vanilla and continue whipping until stiff.
6. Transfer to a pastry bag.

Chocolate glaze:
• 12 ounces semisweet chocolate
• 2 ounces cocoa butter or vegetable oil

1. Melt the 2 ingredients together in the top of a double boiler or a bowl set over barely simmering water.

As Always…

Happy Entertaining!!!

Judy
www.nofearentertaining.com

Saturday, June 27, 2009

Daring Baker’s Make Bakewell Tart…er…Pudding


flickr bakewell tart 1

My Bakewell Tart with homemade Lemon Curd!

The June Daring Bakers' challenge was hosted by Jasmine of Confessions of a Cardamom Addict and Annemarie of Ambrosia and Nectar. They chose a Traditional (UK) Bakewell Tart... er... pudding that was inspired by a rich baking history dating back to the 1800's in England.

Bakewell tarts…er…puddings combine a number of dessert elements but still let you show off your area’s seasonal fruits.

Like many regional dishes there’s no “one way” to make a Bakewell Tart…er…Pudding, but most of today’s versions fall within one of two types. The first is the “pudding” where a layer of jam is covered by an almondy pastry cream and baked in puff pastry. The second is the “tart” where a rich shortcrust pastry holds jam and an almondy sponge cake-like filling.

The version we were dared to make is a combination of the two: a sweet almond-flavoured shortcrust pastry, frangipane and jam.

Well I survived this challenge but just barely. I messed up a lot of things but I have to tell you it seems incredibly forgiving! Did I like it? No not really but that could just have been due to all of my mess ups. It is really everything it says it is suppose to be. On the real plus side I made Lemon Curd again and really, love it!!!

First I will give you the recipe and the directions and at the end I will tell you all of the wonderful ways that I messed this one up!

Bakewell Tart…er…Pudding

Makes one 23cm (9” tart)
Prep time: less than 10 minutes (plus time for the individual elements)
Resting time: 15 minutes
Baking time: 30 minutes
Equipment needed: 23cm (9”) tart pan or pie tin (preferably with ridged edges), rolling pin

One quantity sweet shortcrust pastry (recipe follows)
Bench flour
250ml (1cup (8 US fl. oz)) jam or curd, warmed for spreadability
One quantity frangipane (recipe follows)
One handful blanched, flaked almonds

Assembling the tart
Place the chilled dough disc on a lightly floured surface. If it's overly cold, you will need to let it become acclimatised for about 15 minutes before you roll it out. Flour the rolling pin and roll the pastry to 5mm (1/4”) thickness, by rolling in one direction only (start from the centre and roll away from you), and turning the disc a quarter turn after each roll. When the pastry is to the desired size and thickness, transfer it to the tart pan, press in and trim the excess dough. Patch any holes, fissures or tears with trimmed bits. Chill in the freezer for 15 minutes.

Preheat oven to 200C/400F.

Remove shell from freezer, spread as even a layer as you can of jam onto the pastry base. Top with frangipane, spreading to cover the entire surface of the tart. Smooth the top and pop into the oven for 30 minutes. Five minutes before the tart is done, the top will be poofy and brownish. Remove from oven and strew flaked almonds on top and return to the heat for the last five minutes of baking.

The finished tart will have a golden crust and the frangipane will be tanned, poofy and a bit spongy-looking. Remove from the oven and cool on the counter. Serve warm, with crème fraîche, whipped cream or custard sauce if you wish.

When you slice into the tart, the almond paste will be firm, but slightly squidgy and the crust should be crisp but not tough.

Jasmine’s notes:
• If you cannot have nuts, you can try substituting Victoria sponge for the frangipane. It's a pretty popular popular cake, so you shouldn't have any troubles finding one in one of your cookbooks or through a Google search.
• You can use whichever jam you wish, but if you choose something with a lot of seeds, such as raspberry or blackberry, you should sieve them out.
• The jam quantity can be anywhere from 60ml (1/4 cup) to 250ml (1cup), depending upon how “damp” and strongly flavoured your preserves are. I made it with the lesser quantity of home made strawberry jam, while Annemarie made it with the greater quantity of cherry jam; we both had fabulous results. If in doubt, just split the difference and spread 150ml (2/3cup) on the crust.
Annemarie’s notes:
• The excess shortcrust can be rolled out and cut into cookie-shapes (heck, it’s pretty darned close to a shortbread dough).

Sweet shortcrust pastry

Prep time: 15-20 minutes
Resting time: 30 minutes (minimum)
Equipment needed: bowls, box grater, cling film

225g (8oz) all purpose flour
30g (1oz) sugar
2.5ml (½ tsp) salt
110g (4oz) unsalted butter, cold (frozen is better)
2 (2) egg yolks
2.5ml (½ tsp) almond extract (optional)
15-30ml (1-2 Tbsp) cold water

Sift together flour, sugar and salt. Grate butter into the flour mixture, using the large hole-side of a box grater. Using your finger tips only, and working very quickly, rub the fat into the flour until the mixture resembles bread crumbs. Set aside.

Lightly beat the egg yolks with the almond extract (if using) and quickly mix into the flour mixture. Keep mixing while dribbling in the water, only adding enough to form a cohesive and slightly sticky dough.

Form the dough into a disc, wrap in cling and refrigerate for at least 30 minutes

Jasmine’s notes:
• I make this using vanilla salt and vanilla sugar.
• If you wish, you can substitute the seeds of one vanilla bean, one teaspoon of vanilla paste or one teaspoon of vanilla extract for the almond extract

Frangipane

Prep time: 10-15 minutes
Equipment needed: bowls, hand mixer, rubber spatula

125g (4.5oz) unsalted butter, softened
125g (4.5oz) icing sugar
3 (3) eggs
2.5ml (½ tsp) almond extract
125g (4.5oz) ground almonds
30g (1oz) all purpose flour

Cream butter and sugar together for about a minute or until the mixture is primrose in colour and very fluffy. Scrape down the side of the bowl and add the eggs, one at a time, beating well after each addition. The batter may appear to curdle. In the words of Douglas Adams: Don’t panic. Really. It’ll be fine. After all three are in, pour in the almond extract and mix for about another 30 seconds and scrape down the sides again. With the beaters on, spoon in the ground nuts and the flour. Mix well. The mixture will be soft, keep its slightly curdled look (mostly from the almonds) and retain its pallid yellow colour.

flickr bakewell tart 2

My self-inflicted woes:

  • My first batch of lemon curd scrambled on me giving me lemon flavored scrambled eggs. Nothing really at all appealing about that except when you turn it into Lemon Curd Custard Style Ice Cream (post to come)
  • Could not for the life of me figure out the measurements. Must have been something wrong with my brain but even using the scale wasn’t helping me…
  • Made the crust but even after it being in the fridge for longer than 30 minutes (I played a game of scrabble with the girls) there was no way it was rolling anywhere! I ended up placing it in the pan and pressing it in. Even then it was really sticky. Into the freezer it went.
  • Preheated the oven to 200 degrees. Yep you read that right. I heated the oven to 200 degrees and didn’t notice my mistake for a long, long time!
  • Was making the frangipane and when I went to weigh out the almonds I realized that I was short. Very short. About halfway short. I had some chopped up pecans in the pantry so those got thrown in to the food processor and ground. I probably could have ground the nuts to a much smoother texture but really at that point my head was totally someplace else.
  • I pulled the crust from the freezer and spread my freshly made and perfect lemon curd on top and topped it with my very dark but fluffy frangipane and placed all this in the oven that is set at 200 degrees and set the timer for 20 minutes.
  • After 15 minutes I checked on the tart. Nothing had happened! That’s when logic seemed to filter through the haze and I realized that the 200 degrees was Celsius and not Fahrenheit and that my oven should have been at 400F!!!!!!!!
  • Turned the oven up to 400F and crossed my fingers. After about 20 minutes it had browned up nicely but I think that the 15 minutes of soaking time at 200F had made the crust soggy.

All in all this was a good challenge. It certainly challenged me and isn’t that what all of this is about? Thanks to Annemarie and Jasmine for hosting this challenge!!!

This will be served for dessert to some friends tomorrow night and I am sure they won’t be anywhere near as critical as I am and will love it!

As Always…

Happy Entertaining!!!

Judy
www.nofearentertaining.com

Wednesday, May 27, 2009

Daring Bakers do Apple Strudel

Yum…Who doesn’t like apple strudel and this one was incredible!

P1010441

The May Daring Bakers’ challenge was hosted by Linda of make life sweeter! and Courtney of Coco Cooks. They chose Apple Strudel from the recipe book Kaffeehaus: Exquisite Desserts from the Classic Cafés of Vienna, Budapest and Prague by Rick Rodgers.

The pastry used to make this was incredible. If I made this again the only thing I would change would be to make it a little but sweeter but otherwise this was a perfect dessert and right up there with my favorite DB challenges! Thanks so much Courtney and Linda!

The only changes I made was that I did not do the raisins as I am the only one who likes them and the kids don’t like walnuts so I omitted them as well. I did add about an ounce of Canadian whisky to the apples to give them a bit of warmth.

Preparation time
Total: 2 hours 15 minutes – 3 hours 30 minutes

15-20 min to make dough
30-90 min to let dough rest/to prepare the filling
20-30 min to roll out and stretch dough
10 min to fill and roll dough
30 min to bake
30 min to cool

P1010443

Apple strudel from “Kaffeehaus – Exquisite Desserts from the Classic Cafés of Vienna, Budapest and Prague” by Rick Rodgers

2 tablespoons (30 ml) golden rum
3 tablespoons (45 ml) raisins
1/4 teaspoon ground cinnamon
1/3 cup plus 1 tablespoon (80 g) sugar
1/2 cup (1 stick / 115 g) unsalted butter, melted, divided
1 1/2 cups (350 ml) fresh bread crumbs
strudel dough (recipe below)
1/2 cup (120 ml, about 60 g) coarsely chopped walnuts
2 pounds (900 g) tart cooking apples, peeled, cored and cut into ¼ inch-thick slices (use apples that hold their shape during baking)

1. Mix the rum and raisins in a bowl. Mix the cinnamon and sugar in another bowl.

2. Heat 3 tablespoons of the butter in a large skillet over medium-high. Add the breadcrumbs and cook whilst stirring until golden and toasted. This will take about 3 minutes. Let it cool completely.

3. Put the rack in the upper third of the oven and preheat the oven to 400°F (200°C). Line a large baking sheet with baking paper (parchment paper). Make the strudel dough as described below. Spread about 3 tablespoons of the remaining melted butter over the dough using your hands (a bristle brush could tear the dough, you could use a special feather pastry brush instead of your hands). Sprinkle the buttered dough with the bread crumbs. Spread the walnuts about 3 inches (8 cm) from the short edge of the dough in a 6-inch-(15cm)-wide strip. Mix the apples with the raisins (including the rum), and the cinnamon sugar. Spread the mixture over the walnuts.

4. Fold the short end of the dough onto the filling. Lift the tablecloth at the short end of the dough so that the strudel rolls onto itself. Transfer the strudel to the prepared baking sheet by lifting it. Curve it into a horseshoe to fit. Tuck the ends under the strudel. Brush the top with the remaining melted butter.

5. Bake the strudel for about 30 minutes or until it is deep golden brown. Cool for at least 30 minutes before slicing. Use a serrated knife and serve either warm or at room temperature. It is best on the day it is baked.

Strudel dough
from “Kaffeehaus – Exquisite Desserts from the Classic Cafés of Vienna, Budapest and Prague” by Rick Rodgers

1 1/3 cups (200 g) unbleached flour
1/8 teaspoon salt
7 tablespoons (105 ml) water, plus more if needed
2 tablespoons (30 ml) vegetable oil, plus additional for coating the dough
1/2 teaspoon cider vinegar

1. Combine the flour and salt in a stand-mixer fitted with the paddle attachment. Mix the water, oil and vinegar in a measuring cup. Add the water/oil mixture to the flour with the mixer on low speed. You will get a soft dough. Make sure it is not too dry, add a little more water if necessary.
Take the dough out of the mixer. Change to the dough hook. Put the dough ball back in the mixer. Let the dough knead on medium until you get a soft dough ball with a somewhat rough surface.

2. Take the dough out of the mixer and continue kneading by hand on an unfloured work surface. Knead for about 2 minutes. Pick up the dough and throw it down hard onto your working surface occasionally.
Shape the dough into a ball and transfer it to a plate. Oil the top of the dough ball lightly. Cover the ball tightly with plastic wrap. Allow to stand for 30-90 minutes (longer is better).

3. It would be best if you have a work area that you can walk around on all sides like a 36 inch (90 cm) round table or a work surface of 23 x 38 inches (60 x 100 cm). Cover your working area with table cloth, dust it with flour and rub it into the fabric. Put your dough ball in the middle and roll it out as much as you can.
Pick the dough up by holding it by an edge. This way the weight of the dough and gravity can help stretching it as it hangs. Using the back of your hands to gently stretch and pull the dough. You can use your forearms to support it.

4. The dough will become too large to hold. Put it on your work surface. Leave the thicker edge of the dough to hang over the edge of the table. Place your hands underneath the dough and stretch and pull the dough thinner using the backs of your hands. Stretch and pull the dough until it's about 2 feet (60 cm) wide and 3 feet (90 cm) long, it will be tissue-thin by this time. Cut away the thick dough around the edges with scissors. The dough is now ready to be filled.

Tips
- Ingredients are cheap so we would recommend making a double batch of the dough, that way you can practice the pulling and stretching of the dough with the first batch and if it doesn't come out like it should you can use the second batch to give it another try;
- The tablecloth can be cotton or polyester;
- Before pulling and stretching the dough, remove your jewelry from hands and wrists, and wear short-sleeves;
- To make it easier to pull the dough, you can use your hip to secure the dough against the edge of the table;
- Few small holes in the dough is not a problem as the dough will be rolled, making (most of) the holes invisible.

Please do stop by at the Daring Bakers blogroll and take a look at all the fantastic strudels Daring Bakers across the globe have rolled out!

As Always…

Happy Entertaining!!!

Judy
www.nofearentertaining.com

Monday, April 27, 2009

The Daring Baker’s Do Cheesecake!!!

This is probably going to be one of the worst posts that I have EVER written but there is a very good reason behind it. At the point that I am writing this I have gone without food for about 51 hrs. And yes, this was by choice.

I am participating in a hunger challenge called NoFood4You to help raise awareness for childhood hunger. You can learn more from my post here.

Db challenge Limoncello Cheesecake 005

Anyway on to the Daring Baker challenge…

The April 2009 challenge is hosted by Jenny from Jenny Bakes. She has chosen Abbey's Infamous Cheesecake as the challenge.

Thanks Jenny for a great Challenge!!!

We were allowed huge creative license with this basic cheesecake recipe. I was going to make a margarita cheesecake. Had great plans for this but was not meant to be. T. had used up all the limes!!! But I had lemons!!! I ended up making an incredibly delicious Limoncello Cheesecake with lemon sauce. My modifications are in bold in the recipe.

Everyone loved this cheesecake! It has full of the typical cheesecake flavor. I had some trouble with the crust as I ran out of foil so it was slightly sogged. Otherwise it was great to work with and may make margarita cheesecake for a Cinco de Mayo potluck coming up…

Abbey's Infamous Cheesecake:

crust:
2 cups / 180 g graham cracker crumbs
1 stick / 4 oz butter, melted
2 tbsp. / 24 g sugar
1 tsp.vanilla extract (I used Lemon Extract)

cheesecake:
3 sticks of cream cheese, 8 oz each (total of 24 oz) room temperature
1 cup / 210 g sugar (squeezed together with zest of one lemon)
3 large eggs
1 cup / 8 oz heavy cream
1 tbsp. lemon juice
1 tbsp. vanilla extract (or the innards of a vanilla bean) (I used lemon extract)
1 tbsp liqueur, optional, but choose what will work well with your cheesecake (1 Tbsp Limoncello)

DIRECTIONS:
1. Preheat oven to 350 degrees F (Gas Mark 4 = 180C = Moderate heat). Begin to boil a large pot of water for the water bath.

2. Mix together the crust ingredients and press into your preferred pan. You can press the crust just into the bottom, or up the sides of the pan too - baker's choice. Set crust aside.

3. Combine cream cheese and sugar in the bowl of a stand-mixer (or in a large bowl if using a hand-mixer) and cream together until smooth. Add eggs, one at a time, fully incorporating each before adding the next. Make sure to scrape down the bowl in between each egg. Add heavy cream, vanilla, lemon juice, and alcohol and blend until smooth and creamy.

4. Pour batter into prepared crust and tap the pan on the counter a few times to bring all air bubbles to the surface. Place pan into a larger pan and pour boiling water into the larger pan until halfway up the side of the cheesecake pan. If cheesecake pan is not airtight, cover bottom securely with foil before adding water.

5. Bake 45 to 55 minutes, until it is almost done - this can be hard to judge, but you're looking for the cake to hold together, but still have a lot of jiggle to it in the center. You don't want it to be completely firm at this stage. Close the oven door, turn the heat off, and let rest in the cooling oven for one hour. This lets the cake finish cooking and cool down gently enough so that it won't crack on the top. After one hour, remove cheesecake from oven and lift carefully out of water bath. Let it finish cooling on the counter, and then cover and put in the fridge to chill. Once fully chilled, it is ready to serve.

Pan note: The creator of this recipe used to use a springform pan, but no matter how well she wrapped the thing in tin foil, water would always seep in and make the crust soggy. Now she uses one of those 1-use foil "casserole" shaped pans from the grocery store. They're 8 or 9 inches wide and really deep, and best of all, water-tight. When it comes time to serve, just cut the foil away.

Prep notes: While the actual making of this cheesecake is a minimal time commitment, it does need to bake for almost an hour, cool in the oven for an hour, and chill overnight before it is served. Please plan accordingly!

Lemon Sauce About.com: Southern Food by Diane Rattray

This lemon sauce is made with lemon juice, cornstarch, sugar, and butter.

Ingredients:
  • 1/2 cup granulated sugar
  • 1 tablespoon cornstarch
  • 1/4 teaspoon salt
  • 1 cup boiling water
  • 1 tablespoon finely grated lemon peel
  • 2 tablespoons fresh lemon juice
  • 1 tablespoon butter
Preparation:

In a saucepan, combine sugar, cornstarch and salt. Add boiling water. Cook, stirring constantly, until mixture is thick and clear. Stir in lemon peel, lemon juice, and butter. Serve warm over dessert or bread pudding.

As Always…

Happy Entertaining!!!

Judy

www.nofearentertaining.com

Saturday, February 28, 2009

Daring Bakers Challenge...Chocolate Valentino


This months Daring Baker Challenge was truly one of my favorites! I absolutely loved it and I knew that I would the minute I saw it!!! The cake was perfect and the prospect of making ice cream was wonderful (more on that later). To make this event even more wonderful was the fact that I had my good friend Jenn The Leftover Queen here during the month of February!

The February 2009 challenge is hosted by Wendy of WMPE's blog and Dharm of Dad ~ Baker & Chef.
We have chosen a Chocolate Valentino cake by Chef Wan; a Vanilla Ice Cream recipe from Dharm and a Vanilla Ice Cream recipe from Wendy as the challenge.

Thanks Dharm and Wendy for a great choice!

I do have a confession though...somehow I never got around to making the ice cream! I did make a fresh berry sauce that went with it wonderfully but the ice cream never happened
(no one here likes vanilla ice and I don't have a machine) and I didn't get pictures of the berries. Does it count then that I really did the challenge? I think so!

We made this for a really fun dinner we had with Jenn and her hubby Roberto and 3 other friends of mine that we invited. This was a wonderful ending to a great meal. Unfortunatley by the time dessert was served I got no pictures of the slices!

This cake was so rich, gooey, creamy and full of chocolate flavor. I can't wait for my next excuse to make this...

Chocolate Valentino
Preparation Time: 20 minutes

16 ounces (1 pound) (454 grams) of semisweet chocolate, roughly chopped
½ cup (1 stick) plus 2 tablespoons (146 grams total) of unsalted butter
5 large eggs separated

1. Put chocolate and butter in a heatproof bowl and set over a pan of simmering water (the bottom of the bowl should not touch the water) and melt, stirring often.
2. While your chocolate butter mixture is cooling. Butter your pan and line with a parchment circle then butter the parchment.
3. Separate the egg yolks from the egg whites and put into two medium/large bowls.
4. Whip the egg whites in a medium/large grease free bowl until stiff peaks are formed (do not over-whip or the cake will be dry).
5. With the same beater beat the egg yolks together.
6. Add the egg yolks to the cooled chocolate.
7. Fold in 1/3 of the egg whites into the chocolate mixture and follow with remaining 2/3rds. Fold until no white remains without deflating the batter. {link of folding demonstration}
8. Pour batter into prepared pan, the batter should fill the pan 3/4 of the way full, and bake at 375F/190C
9. Bake for 25 minutes until an instant read thermometer reads 140F/60C.
Note – If you do not have an instant read thermometer, the top of the cake will look similar to a brownie and a cake tester will appear wet.
10. Cool cake on a rack for 10 minutes then unmold.

Silly Jenn taking a picture of me taking a picture of her!

Dharm's Ice Cream Recipe
Classic Vanilla Ice Cream
Preparation Time: 30 minutes


Recipe comes from the Ice Cream Book by Joanna Farrow and Sara Lewis (tested modifications and notes in parentheses by Dharm)

Ingredients
1 Vanilla Pod (or substitute with vanilla extract)
300ml / ½ pint / 1 ¼ cups Semi Skimmed Milk – in the U.S. this is 2% fat (or use fresh full fat milk that is pasteurised and homogenised {as opposed to canned or powdered}). Dharm used whole milk.
4 large egg yolks
75g / 3oz / 6 tbsp caster sugar {superfine sugar can be achieved in a food processor or use regular granulated sugar}
5ml / 1 tsp corn flour {cornstarch}
300ml / ½ pint / 1 ¼ cups Double Cream (48% butter fat) {in the U.S. heavy cream is 37% fat)
{you can easily increase your cream's fat content by heating 1/4 cup of heavy cream with 3 Tbs of butter until melted - cool to room temperature and add to the heavy cream as soon as whisk marks appear in the cream, in a slow steady stream, with the mixer on low speed. Raise speed and continue whipping the cream) or use heavy cream the difference will be in the creaminess of the ice cream.

1. Using a small knife slit the vanilla pod lengthways. Pour the milk into a heavy based saucepan, add the vanilla pod and bring to the boil. Remove from heat and leave for 15 minutes to allow the flavours to infuse
Lift the vanilla pod up. Holding it over the pan, scrape the black seeds out of the pod with a small knife so that they fall back into the milk. SET the vanilla pod aside and bring the milk back to the boil.
2. Whisk the egg yolks, sugar and corn-flour in a bowl until the mixture is thick and foamy. 3. Gradually pour in the hot milk, whisking constantly. Return the mixture to the pan and cook over a gentle hear, stirring all the time
4. When the custard thickens and is smooth, pour it back into the bowl. Cool it then chill.
5. By Hand: Whip the cream until it has thickened but still falls from a spoon. Fold it into the custard and pour into a plastic tub or similar freeze-proof container. Freeze for 6 hours or until firm enough to scoop, beating it twice (during the freezing process – to get smoother ice cream or else the ice cream will be icy and coarse)
By Using and Ice Cream Maker: Stir the cream into the custard and churn the mixture until thick (follow instructions on your ice cream maker)

Wendy's Ice Cream Recipe
Vanilla Philadelphia Style Recipe
Preparation Time: 5 minutes

2 cups (473 ml) of half and half (1 cup of heavy cream and 1 cup of whole, full fat milk)
1 cup (237 ml) heavy cream
2/3 (128 grams) cup sugar
Dash of salt
1 (12 grams) tablespoon of vanilla

Mix all ingredients together (we do this in a plastic pitcher and mix with an emulsifier hand blender-whisking works too).
Refrigerate for 30 minutes or longer
Mix in your ice cream maker as directed.

As Always...

Happy Entertaining!!!

Judy
www.nofearentertaining.com